Easter Craft Ideas: Artsy Dyed Eggs and Cross Painted Glass Marbles

March 17, 2013

Easter is just two weeks away, so there's still time to get your Easter craft on! Gather your kiddos or friends, and a few supplies, and have fun creating!

Here is a recap of our favorite Easter craft ideas. Just click on the title for all the instructions and lots more photos.

Silk Dyed Easter Eggs

Natural Dye Colored Easter Eggs

Cross Painted Glass Marble Magnets

Easter Candy Gifts

~BigSis

Heart Painted Glass Marble Magnets for Valentine’s Day

February 10, 2013

Almost 2 years ago, I showed you how to make painted marble magnets with crosses. Remember these?

Glass Marble Magnet Red Cross

Glass Marble Magnet Green Cross

I've been making them for years, and I especially like to make them for Easter gifts and Christmas stocking stuffers. There's another holiday coming up that lends itself perfectly to these little gifties though. Its Valentine's Day, and that of course means we draw hearts!

The method is the same as I showed you for crosses. With the hearts though, I just freehand it instead of using a guide behind the marble. I'm not sure why I forego a guide with hearts. Maybe it's a deep-seated psychological ideal that matters of the heart should be allowed to be free to become what they will, rather than following a template.

Nah, that's not it.

I think I just like the imperfect nature of these drawn freehand and it kind of reminds me of making Valentines as a kid, back when we weren't so obsessed with everything being perfect. Heart shapes are like pizza to me; even a flawed heart shape is still a happy heart! Bad pizza is still pizza!

If I could give you one piece of advice, however, don't have 3 cups of coffee like I did before you start painting these! Shaky hands and this project don't go very well together. Your hearts might be more imperfect than you expect!

I've tried a lot of different glass paints, and this time I tried a new one. I bought several bottles of Martha Stewart's relatively new line of craft paints that are approved for a variety of surfaces, including glass. It's called Multi-Surface Acrylic Craft Paint, and I chose the pearl finish because I think it's prettier than flat or plain glossy finishes on the marbles. I chose a variety of pinks and lavenders since it's Valentine's Day: Purple Martin, Eclipse, Fruit Punch, Pink Taffeta, and Antique Silk.

Martha Stewart Glass Craft Paint Painted Glass Marble Magnets

Martha also has a new-ish line of glass paint, but it's slightly more expensive and I wanted to see how this multi-surface paint held up. You can air-cure both paints for 21 days, but you can bake the dedicated glass paint if you wish to speed up the process. For these magnets, neither is necessary since we don't need the magnets to be food-safe or dishwasher-safe. I'm just reasonably careful with the marbles until the paint has had a chance to bond with the glass.

Overall, I really like Martha's craft paint. The selection of colors is awesome – as you would expect from Martha. There are also metallic, gloss and glitter finishes in the line too. I would have chosen the glitter variety, but I think it probably would have clogged the tiny painting tips I use.

The coverage was great, and I didn't get many bubbles which is fantastic. If I could change anything, I might wish for the paint to be the tiniest, tiniest bit thinner so that it took slightly less effort to squeeze the paint out of the itty bitty painting tip. On the upside, when I made dots they held their texture and didn't completely flatten out.

So, let's get to it! For more detailed instructions and photos, please refer to my previous post on how to make painted marble magnets with crosses.

The first thing we need to do is gently clean the glass marbles. I like to use straight white vinegar with a water rinse afterwards. Let them dry for a bit, and then dry each one to make sure you don't get spots. Place them on a foil or paper towel lined baking sheet. Be careful not to touch the surface of the marble with your hands, just to make sure no body oils get on your squeaky clean marble. This will help ensure that the paint adheres.

Attach a metal glass painting tip to the nozzle of a plastic paint bottle. You can get the bottles and tips in a kit at many craft stores. Then just draw a heart, and fill it in with paint.

Heart Painted Glass Marble Magnet

Heart Painted Glass Marble Magnet Lavender

Heart Painted Glass Marble Magnets

If you see any air bubbles form, try to immediately pop them with the painting tip. Allow the paint to dry, at least 2 hours, depending on how thick your paint is.

Once your first coat is dry, go back and apply a second coat. The second coat will be essential if your paint is somewhat sheer or streaky, but I think a second coat always helps to smooth and even out the first coat.

Heart Painted Glass Marble Magnets

Heart Painted Glass Marble Magnet

I added one little twist with the hearts that I didn't do with the crosses. I added a sprinkle of glitter to the marble while the second coat of paint was wet, and I like how it came out…sparkly!

Heart Painted Glass Marble Magnet 2c

Heart Painted Glass Marble Magnet 2

After the second coat of paint is completely dry, I flip the marbles over and apply a thin coat of shimmery white to the back. I think it helps to hide the magnet a little bit, but this is totally optional. My favorite paint for this purpose is PermEnamel in White Pearl. With the crosses, I used a variety of colors for the back of the marbles, just for fun and different effects.

Heart Painted Glass Marble Magnet Back

Once that background coat dries, it's time to get dotty. Using a contrasting color of paint, just make dots all over the hearts with the same painting tip. On some hearts I just make an outline, but on others I go dot wild! Here are the finished heart glass marble magnets.

Heart Painted Glass Marble Magnets

Heart Painted Glass Marble Magnet d1

Heart Painted Glass Marble Magnets d2

Heart Painted Glass Marble Magnets d3

Heart Painted Glass Marble Magnets d4

Heart Painted Glass Marble Magnets d5

After your dots have dried, you can attach a magnet to the back and then decide how to package these little gems.

Heart Painted Glass Marble Magnet Candy Box

This is my favorite way. I think they look like little candy bon bons! I used a tiny paper candy cup tucked inside a clear plastic Wilton box that is often used for wedding favors.

You could also package the marble magnets in small drawstring organza bags with a bit of colored shred, or in a stamped paper mache box like I made for the cross painted magnets. Inside the lid, you could include a scripture that focuses on love, a verse from a favorite poem, or anything else that has meaning for you and the recipient of your gift.

Cross Painted Glass Marble Magnet

However you choose to package these heart painted glass marble magnets, I'm sure that everyone you give one to will appreciate that you created a personal handmade gift just for them! That to me is the meaning of the holiday. Happy Valentine's Day!

~BigSis

How my little brain works…

January 22, 2012

I've been noodling around a tiny brainstorm for the last 2 days, so this is how a chunk of my Sunday was spent.  A weird little mess, you say?  Maybe.  I'd rather call it the evolution of an idea. 🙂

Cat Ears Trial

I'll give you the scoop on what I'm up to bit later, but here's a hint…a very beautiful, dangerous and mesmerizing hint.

Sheila

~BigSis

How to Make Glittered Paper Mache Gift Boxes

December 18, 2011

One of the things I made for the Charity Bake Sale for In-Sync Exotics was a set of glittered paper mache gift boxes.  After they were finished, I filled them with paper shred and loaded them up with cookies.

Glitter Paper Mache Box 6

They look like they're covered in sugar or snow, don't they?  There is still time for you to make them for Christmas, so let me show you how easy they are to do.

Glitter Paper Mache Box 3

First, make a quick trip to the craft store for the paper mache boxes.  Mine happened to have the ribbon design as part of the paper mache, but if you can't find this style, a plain box would work fine too.  I found 3 sizes of this same style.  The largest one was a bit bigger than I wanted so I got the smaller 2.

You will also need craft paint in white and colors, white craft glue, glitter and ribbon.  You probably already have those items laying around from other projects.

The first step is to remove any price tags or other labels that might be on your box.  Mine also had a hideous cardboard bow on the top that I pulled off.  Once you have a smooth surface to work with, cover the entire box and lid – inside and outside – in a base coat of white paint.  You don't want that cardboard brown color showing through your sparkly glitter.

Glitter Paper Mache Box 2

I added a second coat of white to the inside of the box and lid, and the bottom of the box since those areas wouldn't get glittered, and I wanted them to look nice and not streaky.  Let the paint dry completely.

Next, I painted the ribbon design with one coat of a contrasting color paint. I chose silver, red and green since I was doing Christmas boxes, but you could do any color.  These don't have to be just for Christmas, but you might have an easier time of finding the boxes at Christmastime. Let the contrasting paint dry.

Here comes the fun part!  Working with just one side of the box at a time, add an even layer of craft glue with a foam brush, and then heavily sprinkle/pour on the glitter and gently tap off the excess. Work your way around the box, being careful not to damage any wet freshly-glittered areas as you go.  Do the same with the lid. Allow the glue to dry overnight or until it is completely dry.  Don't worry if a little glitter falls off as you touch the boxes; that's normal.

Glitter Paper Mache Box 4

When your boxes are absolutely dry, you can add a pre-made bow or ornament to the top, or make your own bows as I did.  I also used a dollar store snowflake ornament on a couple of mine for fun.

Glitter Paper Mache Box 5

I went to a bow-making class at Container Store a few years ago, but I needed a refresher.  I found their Gorgeous Gift Presentation pdf on their web site, and it includes bow-making instructions with photos.

Glitter Paper Mache Box 1

You just start with wired ribbon and follow the directions for the type of bow you like.  I'm not a pro, but it's a pretty fun little holiday exercise.  When you're satisfied with your bow, hot glue it to the top of the box and you're done!  Voila and ta da!

Glitter Paper Mache Box 7

Fill your boxes up with baked goodies as I did, or with any other gift.  Your recipient will love it and think you're uber crafty!

Glitter Paper Mache Box Filled


~BigSis

The Best Gift and Food Packaging Store is PaperMart!

November 20, 2011

How often do you shop online and find great selection, speedy shipping and excellent value?  Not often enough, if you ask me!  I have a site to tell you about that has all three of those boxes checked, and what's even better; they'll help you get ready for Christmas!

Thanks to Anna's recommendation on CookieMadness, I found out about PaperMart a few years back and have been using them ever since.  PaperMart  says they are the largest and most complete packaging store, and I'm here to tell you their claim is justified.

What can you find at PaperMart?  What can't you find might be a better question!  Here are a few of the items we ordered this year for our Charity Bake Sale for Animals (benefiting In-Sync Exotics, by the way).

Paper Mart Paw Print Bags

Paw Print Organza Bags (5″ x 7″ $0.60 each)

PaperMart Paw Print Wire Handle Box

Paw Print Wire Handle Boxes (4″ x 3.5″ $0.88 each)

Paper Mart Candy Cane Ribbon

Candy Cane Satin Ribbon (5/8″ 25 yds $3.94 per roll)

We got the red/pink variety and the red/green one.  Both are gorgeous! These ribbons have the design woven into them, not just printed on like you'll find with cheap ribbon.

Paper Mart Christmas Pink Ribbon

Narrow Christmas Satin Printed Ribbon (5/8″ 25 yds $5.96 roll)

We got the pink Christmas print and the white Christmas ornament prints, and loved both of them.

We loaded up on red and green solid color 5/8″ ribbon too, which was a steal at 100 yds for $3.52.  We were completely impressed by the high quality of all these ribbons.  They are shiny on one side, and matte on the back, but you can upgrade to a variety that is shiny on both sides if you're even more obsessive than we are and don't mind paying a bit more.

We also buy the hard-to-find cello bags that we use for breads and cakes at PaperMart.  I daresay that PaperMart carries pretty much anything and everything you might need for packaging gifts and food this Christmas and year-round.  Check them out and let us know how your shopping experience goes!

~BigSis

How to make a Baby Name Wall Hanging with Fabric Letters

July 21, 2011

Guess who came 2 weeks early?  Little Baby Jack, that's who!  He decided not to wait for his due date, and made his appearance on July 8th, so we're all thrilled to have another sweet little boy in the family!

LilSis had a baby shower for Bry and Rach on June 1st, and we talked about all of the fun things we did for it.  I had a complete blast making these fabric-wrapped letters for Jack's room:

Jack Fabric Letters

I'm not gonna lie to you though…these little dudes were tricky in parts!  I would absolutely do them again, especially since I learned a few tricks of my own along the way.  What kind of a friend would I be if I didn't share them with you?  Not a very good one, I'd say, so let's get busy making some cute letters.

Paper Mache Letters

Start by choosing the name. It sounds simple since you can't change the child's name, but there are some things to consider.  I originally planned on making Jack's middle name too, since I love it so much.  Once I really thought about it though, I realized that would add 6 more letters.  Finding 4 fabrics that coordinated the way I wanted them to was challenging enough, and I think that finding 10 fabrics would have been a gargantuan challenge (aka pain in the tookus).

Besides the fabric selection issue, you also need to think about where the letters will be hung.  I was thinking about “Jack” on one line, and his middle name on a line below it.  But I didn't know what his mom and pop had planned for his room, and I didn't want to assume they'd have space for a wall hanging that large.

Decide on your color scheme as it coordinates with the child's room. I think selecting 2 or 3 colors from his/her color palette is a good rule of thumb.  If you have a sample of their existing fabrics and colors to go by, all the better.

Select your fabrics. Go a little crazy! I love mixing different patterns for a really fun combination.  This is for a baby's name, not a stuffy corporate boardroom, right?  As long as each fabric has the unifying color or colors to tie them all together, they'll work fine.  Try patterns, polka dots, stripes, plaids; whatever grabs you.  I chose fabrics that all had blue, yellow and/or green in them, and opted not to use any solids.

You won't need a lot of fabric.  I got half a yard of each and had plenty extra, just in case of a big boo boo.  One cool thing  I discovered is that a quilter's “fat quarter” is a great size for this project and comes at a fabulous price.  The doggie fabric on Jack's “A” was from a fat quarter that I paid $1.99 for.

Assemble the rest of your supplies. Here's what you'll need in addition to your fabrics:

  • Paper mache letters (I got my chunky ones at Hobby Lobby. They also have thinner cardboard ones.)
  • Quilters batting (I like the thicker poofier batting for this project.)
  • Felt (for the back of the letters; in a color that coordinates with the fabrics)
  • Wide ribbon (for the sides of the letters; choose a color that works with all of the fabrics)
  • Thin ribbon or rope (to hang the letters from)
  • Spray adhesive (to attach the batting to the letters)
  • Staple gun (to attach the fabric to the letters)
  • Hot glue gun (to attach the felt to the back)
  • Scotch tape (for any areas the staple gun won't reach)
  • Xyron sticker maker (to turn the ribbon into a sticker)
  • Pen or marker (to trace letters' outlines on fabric and felt)

Here we go!

Letters on Batting

First, turn your letters upside down on the batting and trace around them.  Marking on the backside of the batting reduces the chance it will show through any lighter fabrics.  Go ahead and trace around the letters on the felt too while you're at it.  For the felt, trace so that the marker will be hidden when it attaches to the back of the letter.

Batting on Letters

Cut out the batting and felt along your lines.  Follow the directions on your brand of spray adhesive, and apply the batting to the front of the letters. Press it down lightly, and allow to dry for a bit.

Decide which fabric goes with each letter.  Lay them out next to each other in different orders, so you can see which ones look the prettiest/most handsome next to each other.

Cut a piece of fabric slightly larger than the letter; I like to allow several generous inches all the way around, especially since the letters I used are so chunky.

Now comes the part that needs all your attention and a bit of patience.  With the fabric right side down, place the letter face down on it.  You're going to go around each letter, keeping tension on the fabric as you pull it to the back of the letter and attach it with the staple gun.

#1, make sure your fingers are out of the way!  #2, make sure the tension on the fabric is consistent all the way around the letter.  I like to do the straight sides first.  If you're working with stripes or plaids, check the front of the letter as you go to make sure the pattern is straight.

Wrap Fabric

When you come to a curve, you're going to ease in the fullness, making smooth little pleats as you go.  You'll need to snip the fabric here and there to allow it to fit smoothly.  I use lots of staples on curves and take my time.

On corners, try to fold under the excess fabric as you would make a hospital corner with your bed sheets.  You can fiddle with it until you get it smooth and sharp, then staple it down.

Back Fabric

Now for the tricky part I mentioned!  Some spots on these letters are a bear to do, especially if you're a perfectionist like me!  The inside of the “A” and the inside angles on the top and bottom of the “K” gave me fits.  I found there wasn't enough fabric in those spots to fold to the back of the letter, so that's when I had to resort to bits of scotch tape.

Just remember, you want to keep the sides of the letters as smooth as you can so bumps won't show through your ribbon, but the ribbon is going to be there to hide any remaining gaps the fabric didn't cover.

Fabric Gap

Once all your letters are covered with fabric, admire your work! The hard part is done!

Front Fabric Done

The next step is to cover the sides with the wide ribbon.  My letters were thick and I wanted a ribbon that would cover the whole side, and not leave any gaps.  I needed a 3/4″ ribbon.  Guess what? They don't MAKE a 3/4″ ribbon, at least not that I could find after many many craft store trips!  Who knew?

What I decided to do was buy a 1″ ribbon and wrap the excess to the back of the letter.  It ended up creating a really finished edge, and I think it worked out even better than a 3/4″ ribbon would have.

Back Ribbon Wrap

I experimented with many different adhesives and fabric glues to attach the ribbon, and couldn't find one that would have great sticking ability but would not stain the ribbon or show through. Hot glue would leave that ugly bumpy ridge so that was out.

My solution?  Run the ribbon through a Xyron sticker maker (with the permanent adhesive).  It works like a charm!  It sticks incredibly well with no staining, and the excess ribbon sticks nicely to the back of the letter.

Xyron Ribbon Sticker

Measure the length of ribbon you need, allowing a bit extra so you don't come up 1/4″ short!  Run it through the Xyron, peel off the backing, and start applying to the sides of the letters, beginning in the most hidden part of the letter so your seam will be as invisible as you can make it.

Ribbon Corner

Attach your felt to the back of the letters with hot glue.  I like to trim off any excess fabric before I do this, just to make the back as smooth as possible.  You can add extra tape or staples to any spots that are wild.  Since hot glue dries so fast, I like to lay down a small amount of glue at a time, working my way around the letter. All of your crazy mess is your secret now!

Felt Back Letters

You're almost done!  The last step is to attach the ribbon or rope (or whatever you like) that the letters will hang from.  I chose a thin white rope trim.  To keep it from slipping out of the staple, I made a small tight knot at the end, and just attached it to the top of the back with the staple gun.

Finished Letter

There are lots of different things you could do with these once they're done.  You can hang them from little wooden pegs like I did, or you could hang them on a curtain rod like a valence over a window.  You could skip the rope (ha ha), and just stand the letters up on a dresser or bookshelf.  Use your imagination!

Finished Letters

That's it!  Adorable, custom-made letters for some lucky adorable custom-made baby!

~BigSis

Origami Gift Packaging for Painted Glass Marble Magnets

March 23, 2011

Origami Box Tulle Done

Last time, I showed you how to make painted glass marble magnets, and I promised to show you how I package them for gifting, so let's get started.  We have a lot of cute stuff to do!

The first component is the paper mache boxes.  Here's what you need:

Glass Marble Paper Mache Boxes

  • Paper mache boxes: I like the smooth paper wrapped ones that you can find at most craft stores.  They usually come in a couple of small sizes, and if you're lucky you might find them packaged in lots of 6 including a heart, circle, oval, square, octagon and rectangle.
  • Parchment paper or round labels, and laser printer
  • Glue: Any glue suitable for paper, like Sobo or Elmer's

Glass Marble Stamps

  • Stamps: I painted crosses on my marble magnets, so I'm keeping with that theme with my stamp choices.
  • Pigment ink pads
  • Embossing powders
  • Embossing heat tool
  • Tongs

Make the scripture circles:

Choose any scripture (or quote) that you like and type it up.  You can do it two ways.  You can buy a sheet of laser-safe Avery round labels and use the formatting template that comes with them in order to line the text up with the labels.

I like to go another way.  I print my scriptures on tan parchment paper to coordinate with the natural color of the paper mache boxes. I think I've seen kraft-colored round labels online, but I've never ordered them.

Glass Marble Scriptures

Use software that will allow you to draw circles; I use an old copy of Adobe PageMaker, but PowerPoint or a drawing program will work. Draw a bunch of circles on your page (check the size of your box lid to determine the circle size), fitting as many as you can on one sheet of paper.  Then type your scriptures into the circles, and print them out.  Carefully cut out the circles just inside the lines with scissors.  I like to use deckle-edge scissors for an uneven shape.

Add a bit of glue to the back of the parchment circle, smear it around evenly, and place it on the inside lid of your box.  Smooth it down so all edges will adhere.  Allow to dry completely.

Glass Marble Paper Mache Box Msg

Decorate the top of your boxes:

Glass Marble Believe

Choose a stamp that will fit the size and shape of your box.  I'm in love with this “believe” stamp.  if I ever got a tattoo, it would probably look like this “believe”!

Glass Marble Purple Cross

Apply the pigment ink to the stamp and then apply the stamp to the box with even pressure, but don't press down too hard or you'll crush the box.  Try not to rock the stamp back and forth. Lift the stamp carefully off the box.

Glass Marble Purple Cross Embossed

Sprinkle a generous amount of embossing powder all over your stamped design.  I like to do this over a paper plate to catch the excess.  Use a different plate for each color of embossing powder. When you're finished, just bend the paper plate into a pointy little funnel and pour the powder back into the jar.

I'm crazy about a couple of embossing powders from Stampendous: Pearlized Carnelian (it turns all gold and gorgeous when heated) and Copper Tinsel (it goes all shimmery glittery).  I love how they look on the paper mache.

Glass Marble Emboss Color Change

Holding the box top with tongs, turn on the embossing heat tool. Hold it a few inches away from the stamped image, and move it back and forth until you can see the embossing powder has melted evenly all over the image.  It won't take very long;  maybe 10 seconds, depending on the stamped image.

Some powders – like the Pearlized Carnelian ad Copper Tinsel – will magically change color.  Be aware that some powders are very susceptible to scorching if they are heated too long, especially the glittery ones.  I've done it, so learn from my mistake!

Glass Marble Paper Mache Box

Your paper mache box is finished! The bottom of your box is still blank at this point, so you can write something there (“Love, BigSis”), or glue on another parchment circle with a message on it (“Merry Christmas 2011”).

Now for the origami box you'll snuggle the paper mache box into!

All you'll need for the origami box is cardstock, a paper trimmer, a bone folder, two-sided tape, a ruler and a pencil.  Easy enough, right?  If you're a scrapbooker or a cardmaker, you already have these supplies on hand.

You'll need two pieces of cardstock for each box.  You can use solid colors, coordinate a printed top with a solid bottom, or use two coordinating prints.  With the paper trimmer, cut one 8-1/2″ square for the top, and one 8″ square for the bottom.  This will give you a finished box top that is about 3″ square, and a bottom that is about 2-13/16″ square.  I've seen some stacks of cardstock at the craft store that are already 8-1/2″ square, and that would be perfect for this project.

Origami Box How 1

With a ruler, lightly draw a diagonal line in pencil from corner to corner.  Some tutorials for this box will have you fold the paper corner to corner, but that will leave an “X” shaped crease on the top of your box, and I like for my box to be smooth, smooth, smooth on all 6 sides.

Origami Box How 2

Working on the wrong side of the sheet, take one corner and fold it up to the place where the two pencil lines meet in the middle of the page.  Unfold.  We're going to call that fold you made the “first crease”.  Do the same thing for the other 3 corners, so you'll have a “first crease” for all 4 corners.

Origami Box How 4

Next, take a corner and fold it up past the middle of the page to meet the “first crease” at the pencil line.  Unfold.  Do the same thing for the other 3 corners. Each time you make a fold, crease it down sharply with the bone folder or the edge of a pen.  Doing this will make the shape of your box more crisp.

Origami Box How 6

For your last fold, take a corner, and fold it down to meet the “first crease” that is closest to it.  Unfold.  You're not going across the middle of the page for this fold.  Do the same thing for the other 3 corners.

Origami Box How 7

So, you made 3 folds with all 4 corners:  up to the middle of the sheet, across the sheet to the “first crease”, and then down a tiny bit to it's own “first crease”.  Your page should look like this.  You have a nice grid of even squares, with a bigger square in the middle.  This is your box top or bottom.

Origami Box How 8

Now we'll take this creased piece of paper and turn it into a box. You're going to fold two opposing sides of the page into a little valley shape, as you see in the photo.

Origami Box How 9

Add a tiny bit of double-sided tape to the bottom of the point, so it will stay in place on the bottom of the box.  Do that for both sides. Do you see the box taking shape?

Origami Box How 10

On the ends, you want to have a smooth finish so you need to make a “valley fold”, tucking the end pieces under.  This is hard to describe in words, so please see the photo below.

Origami Box How 11

Attach tape to the bottom of these points on each end, and adhere to the bottom of the box.  It might help to run the bone folder along the top edge of the box, to get a nice sharp edge there.

Origami Box How 12

Voila!  You just made a box out of nothing but paper and a bit of tape!  All you had to invest was about 8 minutes of your time per box!

Origami Box Butterfly Inside

This is the inside of your box…

Origami Box Butterfly Done

one side of your completed box with it's solid orange bottom…

Origami Box Butterfly Done Side

and the other side.

You have all of these cool components; what do you do with them all?

You have painted glass marble magnets…

Glass Marble Done Group 2

paper mache boxes…

Glass Marble Paper Mache Boxes

and origami boxes.

Origami Boxes Done

Let's put them together into a beautiful little gift that some lucky person will adore!

Origami Paper Mache Open 1

Origami Paper Mache Open 3

Origami Paper Mache Open 4

Take a paper mache box, add a little paper shred, and choose a marble.

Origami Paper Mache Open 5

Origami Paper Mache Open 6

Origami Paper Mache Open 7

Tuck your paper mache box into a drawstring bag.  Some of the bigger boxes won't fit, but that's ok.

Origami Paper Mache Closed 1

Origami Paper Mache Closed 2

Origami Paper Mache Closed 4

Place the paper mache box into the origami box, adding a little more shred around it if you want to.  Put the top on, and add a tulle bow.

Cut a piece of tulle that coordinates with your box color.  For this 3″ box, I used a piece around 6″ x 30″.  You want plenty of it to get a pretty full effect.

Origami Box Tulle Up

Tie the bow on as you normally would, and then cut the loops. Pull the cut loops and the loose ends straight up, and cut them straight across to be even. Pull each of the 6 ends out to open them up, and arrange into a poofy bow. Ends cut shorter will make a tighter looking “poof”, while longer ends will look fluffier.

Origami Box Tulle Done

There you have it!  Your pretty painted glass marble magnet is nestled in shred inside a box with a message inside a box with a bow!

Before I go, I want to give you some ideas on what you can do with these.  Of course, you could sell them.  I sold several hundred to an organization for their annual meeting a while back. Each participant got their own as a thank you gift for attending. I've also sold them a few at a time for Christmas gifts; they make awesome stocking stuffers and gifts for pet sitters, hairdressers, coworkers, or your kids' friends.  They're also great little non-edible treats to tuck into Easter baskets.

My favorite thing to do with these is to randomly give them away. One year on Valentine's Day, I took a whole bag of  them to the cancer floor in a local hospital, and let the nurses distribute them. I've also given one to the person working the drive-through at a fast food restaurant who seemed to be having a bad day. I've given them out to employees of a drugstore who were having to work on Christmas Eve, and I've also given them to the volunteers on my team at the church preschool.

I don't tell you about these things to boast or to glorify myself; I just want to give you some ideas and start you thinking.  I bet you can come up with many more ideas.  If you keep a few in your purse or in your car, you'll be surprised at the occasions that arise when a little gift of encouragement is needed.  I bet you'll be glad you have them, as I have been!  One little note: when I'm putting them in my purse or car, I just put the paper mache box in a drawstring bag, and skip the rest of the packaging.

I hope you enjoy this little craft project as much as I have enjoyed sharing it with you!  If you make any of these items, please send me a photo!

~BigSis

How to Make Painted Glass Marble Magnets

March 20, 2011

Glass Marble Done Fav Green

You've probably seen tutorials for making adorable magnets from the flat glass marbles that are used as filler in vases of flowers. Most of the instructions I've seen involve gluing paper of some kind to the back of the marble: scrapbook paper, gift wrap, newsprint, hand-drawn images, whatever.

Glass Marble Done Group1

I think those marble magnets are really cute and easy to make, but I like to do mine in a different way.  I like to paint them!

There are probably lots of ways to do this, and you can absolutely inject your own creativity.  I'll show you the method I came up with, and then you can take off with your own ideas.

Glass Marble Done Group4

Let's start with the supplies you need:

  • Flat glass marbles: Available at craft stores, discount stores, pretty much everywhere. I buy the clear ones because I can see my template through them, but you can also find really pretty blue, green and amber colored ones.

Glass Marble Paint

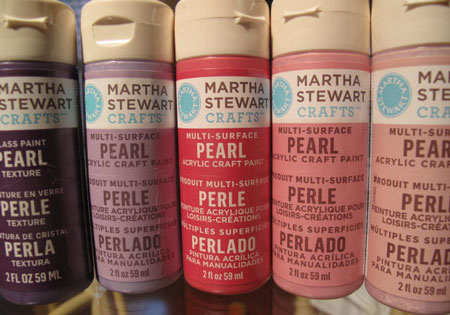
  • Glass paint: I prefer the air-dry kind that doesn't require baking.  I use FolkArt Enamels, Americana Gloss Enamels, DecoArt Ultra Gloss Metallics (these might be discontinued), and Delta PermEnamel.  My favorites are PermEnamel Shimmers and their Iridescent Glass Paint.  Delta PermEnamel is the glass paint equivalent of MAC eyeshadows: they come in jillions of colors, have great textures, apply well and look beautiful!
  • Glass painting kit with tips, adapter caps and plastic bottles.

Glass Marble Tip Kit

  • Grid paper:  To make your painting template.
  • Swarovsky crystals: Find them in the jewelry-making aisle at your craft store.
  • Tweezers: To apply the crystals.  Just raid your bathroom drawer, don't buy special jewelry-making ones.

Glass Marble Magnets Glue

  • Magnet “buttons”
  • Glue: Strong glue for slick surfaces, like Aleene's Glass & Bead Adhesive, E6000 or Bond 527.
  • Magnifying craft light: If your eyes are “mature” like mine.  This is close work, so don't be too proud to use it!

The first step is to create a clean painting surface, and sometimes these marbles are a little dirty.  I give mine a quick rinse in straight white vinegar, but you could also use alcohol.  I use a large plastic container, and fill it with the marbles.  As you remove the marbles from the bag, be very careful.  They're glass, of course, and it isn't unusual to find a broken or badly-chipped marble.

You'll notice that I'm working with a lot of marbles.  It makes sense to me to paint a large batch at one time, since I already have all the stuff out.  Changing paint colors requires washing supplies, so I might as well do several marbles of each color while I'm at it. For this tutorial, I painted 7 dozen marbles.

Add vinegar or alcohol to cover the marbles, and let them sit for a few minutes.  Scoop them out with a slotted spoon, and lay them out on a thick towel in a single layer.

Glass Marble Magnet Wash

You can blot them a little or just let them naturally dry.  I've never had a problem with spots forming, so air drying is usually fine. You definitely want the marbles to be completely dry before you start painting.  Try not to touch the surface of the marbles from this point on, since the natural oils in your fingers could interfere with the paint adhering.

Once they're dry, remove the marbles from the towel and place them on an old foil-lined cookie sheet or tray.  I also cover another tray or sheet with foil to have a place for the marbles as I finish working on each one.  This 7 dozen is all lined up, ready to get dolled up!

Glass Marble Magnet Dry

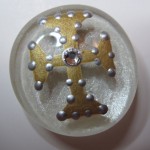
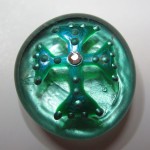
You may be able to freehand your design, but I can't.  Years ago, when I came up with the idea of painting these, I tried freehanding and it wasn't pretty.  I'm crafty, but not artsy, so I need a template.  I like to paint crosses, so it was very easy to draw a cross template on a piece of gridpaper.  Can you tell how well used/loved this template is? 🙂

Glass Marble Magnet Template

Once you get your design drawn out, attach it to a piece of cardboard so it's sturdy.  Here's a trick for you.  Cover the design with a few pieces of removable two-sided tape.  This semi-sticky surface will hold onto the marble just enough to keep it stable and in place while you're painting on it.  When the tape eventually gets covered with cat hair (or dog hair or lint) you can easily peel it off and replace it with fresh tape.  It really makes a big difference.

If you need the magnifying light, now is the time to pull it out. Place your template on your work surface, and choose a marble, any marble.  Imperfections are common in these guys, so don't expect a perfect flawless one.  That's part of their appeal.  Discard chipped ones or any that just aren't pretty to you.  Center your marble on top of the sticky template.

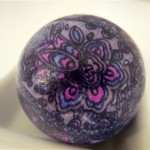
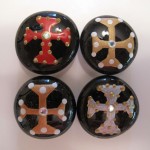
Here comes the fun part…painting!  Select the color you want to paint your crosses.  I love metallics: gold, silver and bronze.  I also love the gorgeous shimmery opalescent colors from Delta PermEnamels.  You can customize the color of your marbles for the occasion or the season, or just use the colors you like.

Glass Marble Magnet Tips

So how do you get the paint on the marbles?  Using a brush is too tricky for non-artist me, so I went looking for an easier solution. What I found are these brilliant metal glass painting tips that look like little ballpoint pen tips.  I've seen a couple of different kits at the craft store, and the tips may vary a smidge, but they always include the tips, small plastic bottles, and the adapter caps that screw onto the paint bottle.

The little metal tips snuggly screw onto the plastic adapter caps. I find that they also fit perfectly on the caps of some paint bottles.  If you're using paint that comes in a chubby jar like the Delta PermEnamel, you'll need to pour a bit of it into a small paint bottle that fits the adapter cap.

Glass Marble Tips on Caps

Once you have the tip securely on the paint bottle, test it out before you paint.  I keep a paper plate and a paper towel nearby for this purpose. Draw a line of paint on the paper plate to make sure the paint is flowing smoothly, and then wipe off the tip cleanly.

These painting kits also come with a little piece of wire that you can use to dislodge any clogs that might form in the tips, so keep this little jewel on your paper plate too.  Some paints are really bad about clogging, but others don't clog at all.

And a word to the wise, when you change paint colors and switch to a new tip, be sure to drop the used tip and cap into a cup of water.  If you let it sit and dry out, you'll pretty much be up a creek and have to toss those pieces.  You'll never get dried paint out of that skinny little tip.

Now, back to painting.  I start at one end of the marble, and just follow the template, filling in the design.  You don't want to squeeze the paint bottle really, just hold the bottle like you were holding a marker or pen, and guide the paint around the template.  The paint shouldn't be so thick that it will drip or ooze, but you do want good even coverage after two coats.

Glass Marble Magnet 1 Coat Metallic

Don't drive yourself crazy by striving for perfection, especially with this first coat. After the second coat, you'll be happy with what you see, so don't worry.  The main thing is to keep within the lines, and have fun!  If you make a mistake, you can try to clean it up with a toothpick.  If it's a doozie of a boo boo, just toss the marble and move on to the next one!

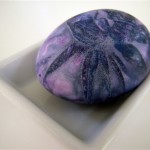
Tada!  First coat complete!

Glass Marble Magnet 1 Coat Close

Let the first coat dry thoroughly; I prefer overnight.  For the second coat, you won't need the template, so just make sure you stash it in a safe place for next time.

Take the same color paint, and add your second coat.  You can smooth out any rough edges and fill in any sparse areas.  Once you're finished, allow the second coat to dry overnight again.

Glass Marble Magnet 1 Coat Wide

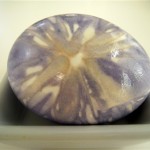
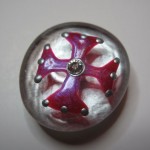
Did you think we were finished?  Oh, heck no.  The fun's just starting!  We're going to add a background color to the BACK of your marble.  You can skip this step if you want to, and sometimes I do, but I think it really adds a lot.  It gives dimension and depth to the marble, adds a contrasting or complementary color, AND hides the magnet you're going to glue on the back. Go a little crazy with your background color, or just let the design color be the star.

Glass Marble Magnet Back1

For this step, I use a small flat paintbrush.  And…you got it, let it dry overnight.

Glass Marble Magnet Back All

If you've chosen a sheer color, like my pearly white, you might want to add a second coat after the first sets up, but it isn't necessary.  It's up to you!  If you want to see how a color might look behind your cross, just hold up your marble to the bottom of the paint bottle, like this.

Glass Marble Magnet on Paint2

Glass Marble Magnet on Paint1

We're coming down the home stretch, so stay with me.  You have two coats of color on your cross, plus a coat or two of background color on the back of the marble.  I like to add a magnet at this point.  If I do it now, I don't have to rest the marble on it's frontside after the delicate little dots are applied, and risk smushing them down a bit.  I like for the decorations to be as dimensional as possible.

Glass Marble Magnet Glue

To attach the magnet, add a tiny dot of glue to the magnet and to the back of the marble, and allow it to sit for a minute or two (check your particular adhesive for directions).  Any longer and the glue may dry too much.  Attach the magnet, and set aside to dry… overnight.

Glass Marble Magnets All

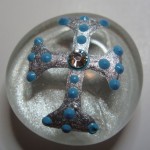
Now the last steps!  It's time to decorate the front of the marbles.  I do dots because they're easy and I like how they look, but you could do squiggles or lines or anything else your imagination can conceive of.  Choose any color!  I really like adding a dot color that coordinates with the background color, but other times, the dot color just comes out of the blue.

Before I add the decorative dots, I add one teensy tiny dot of paint (you could use glue, but you already have paint in your hand) to the center of the cross and carefully place a swarovsky crystal with the tweezers.  Press it down very gently.  Then just add dots here and there all over the marble, in any pattern you like.

Glass Marble  Magnet Done Fav Gold

Voila!  Your marble magnet is finished! Do you love it?

Glass Marble Magnet Done Fav Pink

I love to give these painted marble magnets as little gifts, so they need to be packaged up cute.  I've seen people put the paper-backed magnets in Altoid tins, and it's kind of cool that they stick in place and don't rattle around.  You'd have to decorate the tin though, and you have to deal with the raised logo on the front of the tin unless you buy flat new ones.

Glass Marble Magnet in Altoid Tin

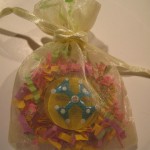
You could also put the marble magnet in a little drawstring bag with a bit of pretty shred.  This is kind of sweet and Eastery-baskety.

Glass Marble Magnet Favor Bag

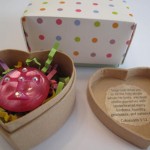
What I like to do though is to take this beautiful marble to the next level by customizing a little paper mache box for it, with stamping, embossing and a scripture hidden inside.  Then it goes into the drawstring bag, and then into a handmade origami box. And if that isn't enough, we'll then wrap up the whole thing with a tulle bow.  Overkill?  Nah!  There's no such thing as overkill when it comes to giving gifties!

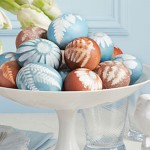
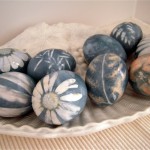
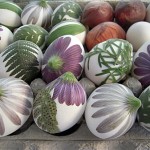
I'll show you how to do all of that next time, and share some of my favorite ways to give these away!  Til then, here are a few more of my favorite marble magnets from this big batch.  See you soon!

Glass Marble Magnet Done Yellow

Glass Marble Magnets Done Blue

Glass Marble Magnet Done Fav Silver

Glass Marble Magnet Done Black

Glass Marble Magnet Done Gold

Glass Marble Magnet Done Fav Red

Glass Marble Magnet Done Purple

Glass Marble Magnet Done Fav Green2

Glass Marble Magnet Done Pink

~BigSis

My Inspiration Board

March 3, 2011

I've been wanting to create an inspiration board for a long time but I've never managed to set aside the time to do it. Thanks to my dear friend, P, who gave me a great IKEA desk, I finally carved out a little corner for myself in our guest room to use as a combination office/craft area. P knew I had wanted to do this for a good while already as I'd been looking around at other desks I could get for myself online using sites similar to https://www.officemonster.co.uk/office-desks-1 and others. Finally getting a desk urged me to create the space I wanted. Having my own space got me really motivated to get my inspiration board made so I could hang it right above my desk.

And since March is National Craft Month, I thought this would be the perfect time for this project. BigSis and I are both crazy about all different sorts of crafts and we recently decided that we want to start sharing more “DIY” crafts with you here on our site.

This bulletin board was Bry's when he was in high school over ten years ago and I've had it stashed in the back of a closet ever since just waiting to be transformed.

This is what it looked like when I pulled it out of the closet.

Inspiration Board

The first thing I did was clean it up and paint the frame a glossy black.

Inspiration BoardI found some nice, thick Scrapbook paper at Jo-Ann Fabrics for a great price, so I bought four 12″ x 12″ sheets with a scrolly design for the corners and four more 12″ x 12″ sheets of a pretty cursive handwriting design to fill in the center and cover all the cork.

Inspiration Board

Once that was done, I just gathered some of my favorite photos and items that inspire me and make me happy. Here's a little something about what some of these mean to me.

I've wanted to go to Italy for many years and BigSis & I hope to some day take a two week dream vacation across Italy.

Inspiration Board

I've talked before about how badly I want to see the Sistine Chapel. This is at the top of my bucket list.

Sistine Chapel on Inspiration Board

Maui happens to be one of my most favorite places on Earth. Just the thought of sitting outside on Kaanapali Beach having lunch at Hula Grill or strolling the artsy/fartsy streets of Pa'ia always makes me smile. These are just a few photos from a previous vacation.

Inspiration Board

I'm inspired by a lot of different things when it comes to my passion for art. Scents, colors, textures, and creative people inspire me. And reminding myself not to worry so much helps keep my mind clear.

Inspiration Board

I collect greeting cards designed by the amazing artist, Josephine Wall and these are just a couple of my favorites. I've made four sculptures that were actually inspired by her cards and my Mermaid was the first and inspired by this card.

Inspiration Board

My ‘Shell Queen' sculpture that I created several years ago was my first to ever be exhibited at a gallery show and she was inspired by another one of Josephine Wall's gorgeous creatures, “Shell Child”. I'm now in love with “My Lady Unicorn” and I think she may be my next sculptural inspiration.

Inspiration Board

And, I also mentioned my love of these bookshelves on our site a couple of years ago. I'd love to have some floor to ceiling bookshelves like these so I think if I keep looking at this photo and visualizing it, maybe I'll have some like this some day!

Inspiration Board

Yoga is a big stress buster for me and I want to be able to do this version of the pigeon pose one day; I came close a few years ago. This photo just inspires me to continue with my yoga practice.

The ceramic cross hanging in the corner is from a series I sold to an art gallery years ago. I have a goal to get back in my clay studio to start producing some new creations before the end of the year and this helps to inspire me.

Inspiration Board

This was such a fun, inexpensive project! I bought some ribbon and some small, headless pins in addition to the scrapbook paper, but the cost was still less than $10.00 since everything you put on your board is either an inspiring photo or an item that you already own.

I just finished my board today and I'm so anxious to get it hung so I can look at it every day. Why didn't I make time to do this sooner?

Inspiration Board

It was probably because I didn't have one single space in my house that I could call my very own. Now, I do. And it makes me very, very happy! 🙂


~LilSis