April 2, 2010
Are you tired of coloring Easter Eggs the same old way? I am. I'm tired of just plopping a dye tablet in a cup, adding a little vinegar and water and taking turns putting the eggs into the cups. Boring!
And, if you'd like to be a little more health conscious and avoid the artificial dyes, you may want to consider using one of these natural dyes to color your eggs this year!
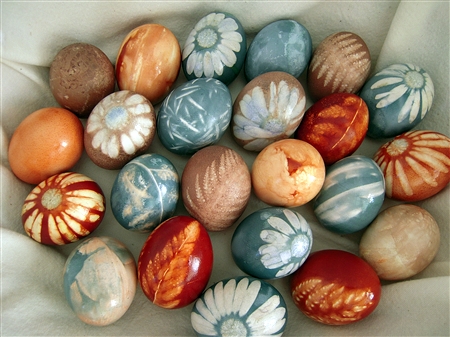
This was a little time consuming, but it was one of those projects that was so much fun because the end result is somewhat of a surprise. It reminded me of how I always feel when I open up my kiln after a glaze firing. It's like Christmas! The anticipation almost kills me every time. When I had more time for ceramics, I would almost always find a way to incorporate some leaf or flower impressions in most of my projects. In my wall tiles and mosaic tiles, I've used a lot of the same leaves and flowers that I used for this project.
Alright, sorry I'm rambling about ceramics; let's get back to the Easter eggs. This was my first experiment in making natural dyes so I was winging it a bit and didn't have any idea of how these would turn out. I looked over a few recipes online but didn't use one in particular, just the basic method, so let's get started.
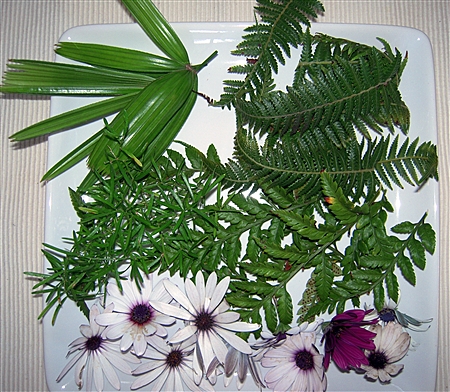
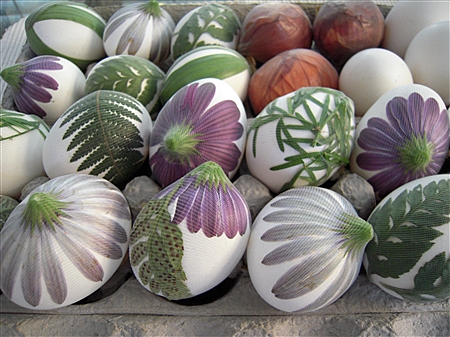
First, gather your leaves, flowers or stickers that you plan to use for this project. Here's what I used.
Next, depending on which variation you want to make, you'll use one of these.
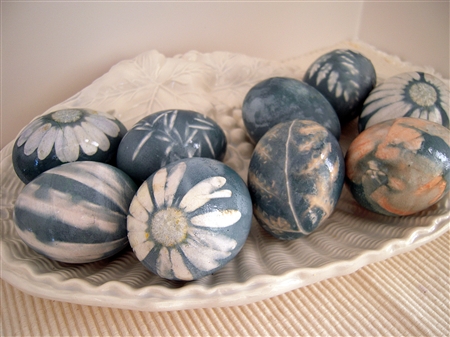
1 head of Purple cabbage (If making the blue eggs.)
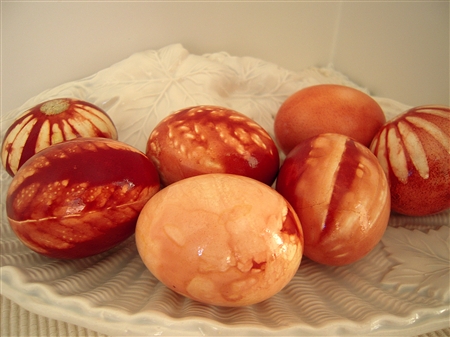
Yellow onion skins (I used the skin from 3 onions for this rust color.)
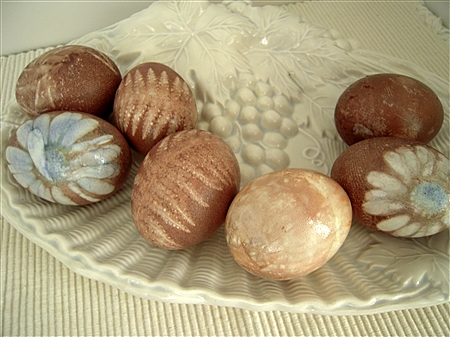
1 bag of fresh cranberries (For the disappointing brownish color.)
Whichever color you decide to make will determine the size of your pan. Obviously the whole head of purple cabbage will take a larger pan than if you use one of the other two ingredients.
Once you decide which color you are going to make, use the appropriate size pan. But, before you add the vegetable or fruit to your pan, place an egg in the pan and fill it with enough water to cover the top of the egg by at least an inch. Then remove the egg. Don't add more water. If you use too much water, the color of the dye will end up being too diluted.
Place the sliced cabbage, onion skins, or cranberries into the pan and boil for thirty minutes, covered to minimize evaporation. Allow water to cool slightly, and then strain contents over a bowl, pressing pulp to remove any remaining liquid.
Rinse the pan, pour in dye water, cover, and return to low heat to keep warm while preparing eggs.
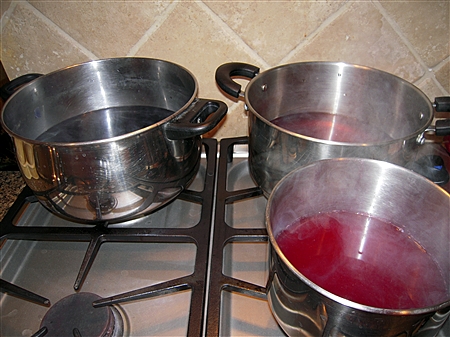
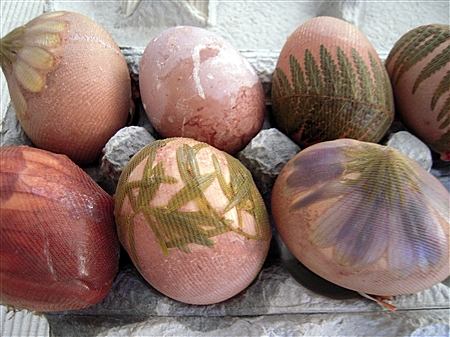
Here are the natural dyes all strained and waiting for the eggs.
Next, you'll want to gather a few more items.
Vinegar
Scissors
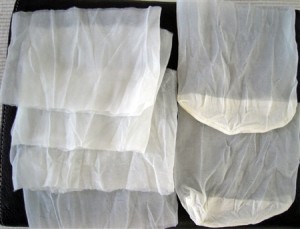
Pantyhose
Twist ties
Slotted Spoon
Paper towels
Vegetable oil
Now, cut the pantyhose into 4 inch pieces.
(Some instructions I saw said that you needed to buy several pairs of knee highs and just use the toes, but I just bought two 99 cent pair of pantyhose, cut them into pieces and it worked fine.)
Now for the fun part.
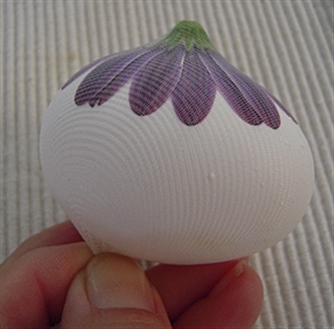
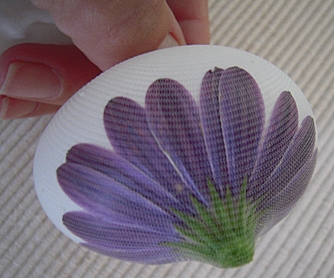
One at a time, place leaves, flowers, or stickers on the egg as desired. Some of the plant materials will stick better if you dip them in water first.
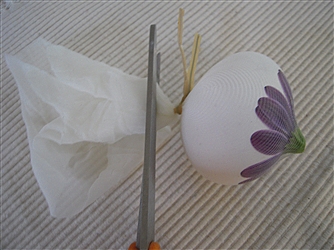
Place the egg in your hand, and gently place the egg inside the hose, make sure your design is still how you want it, and then pull the hose securely it the back and secure with a twist tie. (I thought this was easier than trying to tie in a knot while holding everything in place.)
Trim the excess hose from the back.
Repeat with remaining eggs.
Return dye to a gentle boil and stir in vinegar. I used 4 T. for the purple cabbage and 3 T. for the onion skins and cranberries since they were in smaller pans.
Here are all my eggs ready to go into the dye.
Gently lower the eggs into the pan and boil for 30 minutes. Turn off heat, cover, and let stand for 2- 3 hours, or until desired color is obtained.
Remove eggs with a slotted spoon and place back on egg carton to cool slightly.
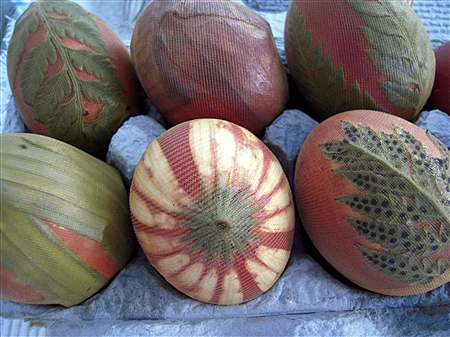
Here's what they look like after you've taken them out of the dye.
Carefully untie the twist tie or cut the hose and unwrap eggs. Carefully pull off and discard any remaining plant materials or stickers.
I let mine sit for an extra 5 or 10 minutes after I unwrapped them just so they could cool a bit more.
Dampen a paper towel lightly with oil and buff eggs until shiny. Remove excess oil with clean paper towel.
Be very careful not to wipe too hard as some of the dye might come off.
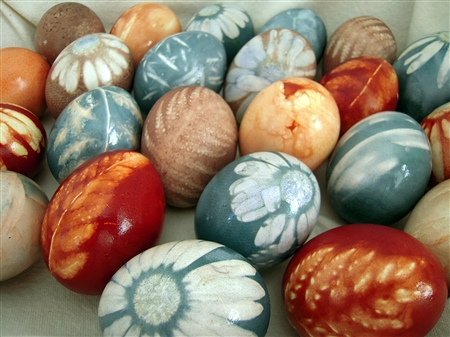
Like I said before, this project was pretty time consuming, but it was so much fun for me! I feel like I got my creative juices stirring again. 🙂
A few notes:
I kept one egg without any decoration to put in each dye color and I didn't care for any of those three at all.
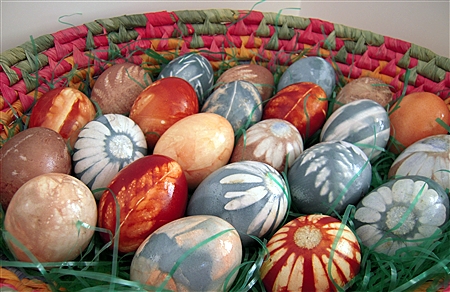
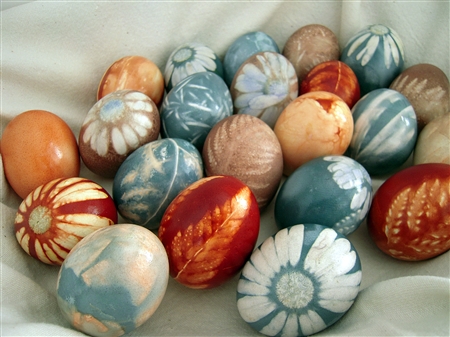
I used just plain yellow onion skin on one egg in each dye color and a couple of those made some beautiful marbling. The one with the onion skin in the purple cabbage dye was probably my favorite. It had a gorgeous brownish-blueish marbling effect.
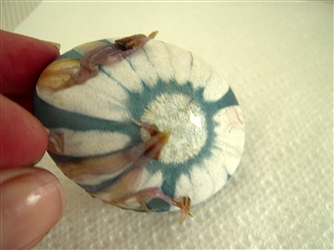
I wasdisappointed in the brownish color that I got from the cranberry dye, but on one egg where I used a purple flower, it gave off a beautiful blueish color in the center of the white flower. I don't think that I would bother using cranberry again for this project. I was expecting a purplish color, not brown.
The dark rust color from the onion skins is probably my favorite. And this dye didn't even need to sit for two hours before it intensified in color. You could probably even take these out after 30 minutes or so.
I just love this method of using the leaves and flowers for contrast in color on these eggs. I'm already thinking of ways to use this for another project.
I should have posted this sooner, but I hope you give these a try if you have a little time before Easter!
- Leave a Comment (176)
- Find more in Holidays, Easter, Natural dyes



April 2, 20107:59 pm
Gorgeous! When I was teaching I did this every year with my students and it was always so much fun!
.-= Michelle´s last blog post … Chicken Pancakes….So Good! =-.
April 2, 20109:14 pm
Your Easter eggs are so creative and gorgeous! Love these natural colors.
.-= marla {Family Fresh Cooking}´s last blog post … Food Blog Forum in LA =-.
April 2, 201011:16 pm
Hi Michele,
I bet this was such a fun project with your students! I loved it!
April 2, 201011:18 pm
Hi Marla,
Thank you. They were natural colors but were still so vibrant! And a TON of FUN to make!
April 3, 20109:27 am
Oh my gosh, these are stunning!! I am in love with this post, so much fun!!
.-= Jenny Flake´s last blog post … Want Some Free Cinnabon? =-.
April 3, 201011:01 am
Thanks Jenny!
This project was a lot of fun! If I had time, I’d make some more! 🙂
April 4, 20103:52 pm
These have to be the most beautiful Easter eggs I’ve ever seen. Wow!
.-= Cookin’ Canuck´s last blog post … Blog Anniversary & My Top Ten Recipes =-.
April 5, 20107:40 am
Cool!
April 5, 20107:41 am
Cool!
.-= Tracy´s last blog post … Rhubarb Crumble =-.
April 5, 201011:41 am
These Easter eggs are beautiful!
.-= Jen @ How To: Simplify´s last blog post … Simple Black and Blue Cobbler =-.
April 5, 201012:34 pm
WOW amazing!! The most original that I have seen – Love them!
.-= Cathy – wheresmydamnanswer´s last blog post … Betcha never knew this about PEEPS! =-.
April 7, 20105:31 am
ooh-la-la! these are so exquisite, lilsis! as a child, my favorite part of easter was dying eggs, and now i see that it can be my favorite part again, but in a more elegant and sophisticated way. 🙂
.-= grace´s last blog post … upstaged =-.
March 13, 20115:05 pm
OMG!!!!!!Absolutely beautiful!!! It so so incredible how you took and old fashioned idea and brought it to a whole new level of creativity and beauty. I love flowers and crafty things to do. I can’t wait to try this for myself. Wish me luck. Country living found a home run on this cover.
You did an awesome job!! lil sis 🙂
March 18, 20119:00 am
Hi lil sis,
Loved the eggs. Absolute super job. I’m not crafty like that so it’s nice to know we have one in the family. Posted your website at work sooo I’m hoping they order on your site. TWYS, Love ya, marion
March 20, 20113:43 pm
Those eggs are absolutely stunning! What a fun and creative project! I loved it!
March 20, 20113:56 pm
Congratulation! On the cover of Country Living! How exciting for you! Way to Go!
March 20, 20114:58 pm
Thanks, Kimber, Marion, & Nicki!!
It was a fun project and very exciting to re-create it for Country Living. 🙂
March 22, 20117:59 pm
Beautiful, Sonia — found “your” magazine in the store – I got so excited, I got a little teary & did a happy dance. Congrats!
March 23, 20117:16 pm
Beautiful and no chemicals…a friend grew up in Germany during ww11 and showed me how they dyed the eggs with onion skins as that was all they had..now I’ll try the other veggies..thanks!!
March 25, 20111:08 pm
Gorgeous, creative idea! I hate to show my ignorance, but can you still eat the eggs after boiling them for 30 minutes? Thanks for sharing!
April 1, 20112:44 pm
I made these with my daughter last night. They are absolutely beautiful. We blew our eggs out so that we can keep them as decorations for years to come. Thanks for the inspiration.
April 1, 20116:10 pm
Lisa, I’m so glad to hear that you enjoyed this project with your daughter. When I do this again, I will blow out the eggs since they turn out so beautiful!
Happy Easter!
April 1, 20116:11 pm
Thanks, Renee!!
That’s so sweet! I was pretty over the top excited when I saw the cover, too!
happy dance, happy dance!! 🙂
April 1, 20116:13 pm
Hi Joanne,
Thanks for sharing your comment. The eggs made from the yellow onion skins are actually my favorite because of the beautiful rust color and the dye is a lot stronger than the other two. The purple cabbage dye definitely has to set on the eggs for at least two hours for them to turn blue! Good luck!
April 1, 20116:14 pm
Kim, you can definitely still eat eggs that are boiled for 30 minutes. Just make sure to refrigerate them right after you clean them off. We ate all of ours! 🙂
April 1, 201111:46 pm
Your botanical resist-design eggs are the most gorgeous, classy things I’ve seen lately — and eggs are so beautiful just because of their shape. I just saw it in the issue of Country Living and immediately looked it up in the magazine, and then went to your site. I used to mess around with natural dyes; I’m impressed with their effect on the eggs.
April 2, 201110:29 am
Thanks Elizabeth! I’m so glad that you came to our site to look at the original project. It was such a fun project and the eggs do turn out beautifully.
My favorite dye is the one with the onion skins because the results are quicker and the longer the eggs sit in the dye, the rust color just becomes a darker shade. When using the cabbage, you have to let the eggs sit at least two hours for them to turn blue!
Send me an email and photos if you do this project! 🙂
April 7, 201111:43 am
These are SO pretty! Found the idea in Country Living Magazine… congrats on the feature! ?
April 9, 201110:35 am
Thanks DancingMooney!
We’re so glad that you took the time to come check out BigSisLilSis! Hope you continue reading! 🙂
April 9, 20115:11 pm
My Grandma used to dye eggs with onion skins and we thought they were the ugliest things compared to the lovely pastels our friends had.
I’ve always been fond of botanical prints. Now, combined with the nostalgia of warm childhood memories and green living, your natural Easter eggs are positively awesome to me. They’re real eye candy!
April 15, 201110:03 am
FANTASTIC!!!! I’ve really enjoyed making these eggs!! Can’t wait to experiment with natiral dies. Also interested in your book give away. any chance this is available in Ireland? Count me in as a new subscriber!!
April 16, 20118:16 am
Hi Love the article. I’ve done this in the past I did find that if I boiled the onion skins for a short time it gave me a very soft yellow. Also some green leaves will give you a green color I don’t remember the leaves I used back then.
April 18, 20118:42 pm
These are so beautiful, unfortunately where i live there are no ferns or flowers yet, i was wondering if i used fake flowers and such if this will still work? I am going to try it tomorrow but in case you had an idea and got to this before i dye them I thought I’d ask. I am blowing out my eggs for sure after I saw hoe lovely yours were there was no way I wanted to crack them and eat the eggs I want them to last!! Lovely thank you so much for sharing!
April 19, 20114:54 pm
Thank you, Brandie. It’s really a fun project and I’m glad that you’re going to give them a try. Silk or plastic flowers should work fine. Just make sure that the pantyhose is wrapped tightly around the egg so no dye leaks under the flower. I would definitely blow mine out next time. 🙂
April 19, 20119:11 pm
thanks for commenting back so quickly! I did check before I started dying them. They are soaking now so I’ll let you know how they come out! I blew the eggs out before hand so had to weigh them down in the water also tried putting one into the mix either the water was too hot or it touch the bottom of a too hot pan and cracked so beware and let it cool when you do this method!
April 19, 201111:02 pm
well the rust ones came out very light, not sure if it is because i didn’t boil them 🙁 they still look pretty but nothing like yours. I let those soak for about an hour. the blue ones are soaking now and I’m going to leave them in for an hour longer than you did and the fake flowers let the dye soak in the fabric more than the real ones so it did not leave as much of a contrast as I had hoped. I didn’t get to the web before i bought the flowers so next time if i must use the fake kind i will try silk or plastic. or suck it up and spend a few more dollars for the real thing. I wonder if there is anyway to get them really dark and still have them blown out? sorry to bombard your comment section!
April 20, 20111:37 pm
Brandie,
No problem with leaving questions here in our comment section. We always try to reply.
Sorry you were disappointed with your rust ones. Those were my favorite. I would have thought that the color would have turned out the same if you boiled the onion skins and then let the eggs soak.
The purple cabbage ones took the longest to turn blue. Let them soak for at least two hours or longer.
If you weighed them down in the dye with a pan or something and just kept them in the dye for hours, they should get darker.
Hope this helps! 🙂
April 22, 20115:55 am
Wonderful eggs!, very beautiful! Happy Easter!
April 22, 20113:26 pm
Omgosh I just fell in love with these when I saw them on my country living mag! sooooooooo beautiful! Definetely the most creative egg I think I have ever seen. Love them!
April 24, 20117:29 am
these are cool. i will definately try this next year….i am already thinking of using tea leaves, maybe red zinger, cuz it has such a strong color….and maybe beets. have a wonderful holiday 🙂
April 24, 20119:37 am
Nice and congratz on the mag spot! I was wondering if anyone knew of anyother plants I could use to get different colors, I like the ones here but I also prefer diversity as well. I saw a post above said if you add some green leaves although he could not rember the plabt you get a green color. Also what is a good way to weigh the eggs down once blown out? Anyways thanks for any advice I do appreciate it!
April 24, 201110:00 am
Thanks for your wonderful, creative idea for dying eggs! We started with pre-cooked, cooled eggs. We had a great time experimenting with your dyes and other natural ones: pickled beet juice turned the egg a pretty pink; coffee grounds, even without vinegar, made the egg a light brown; red cabbage, boiled only 10 minutes, produced a pretty teal blue egg; unknown garden weeds (plants and roots), made yellowish tan egg; our cranberries produced a greenish gray egg; cranberries and red cabbage together made a blue-gray egg. We loved your warm rust onion-skin dye. We used “footies” from a shoe store to hold plants in place, and boiled each dye for ten minutes or so before pouring each dye into a separate glass. We then soaked the pre-cooked eggs for several hours. We loved the results, and are with Brandie, who didn’t want to crack and eat her eggs, but rather keep them on display! Thanks again, and Happy Easter!
April 24, 201110:22 am
How beautiful! I even like the brown ones! I don’t have time to do these today but I will definitely be doing them in the future! They would even be beautiful for a spring brunch! Thanks so much for sharing your gorgeous photos and wonderfully detailed tutorial.
Jennifer
April 24, 20111:48 pm
Thanks, Nilla! Thanks, Monica! Thanks, Bonnie!
April 24, 20111:54 pm
Thanks,Eric!
I’ve read that you can use spinach leaves to obtain a green color, but I haven’t tried it myself. Good luck if you decide to try these! 🙂
April 24, 20111:58 pm
Nancy and Susan,
Thanks for sharing all that info on your experimentation with the natural dyes. I’m glad to hear that you had fun with the project, like I did.
I think I’ll try some with the beets when I make these again. And, I probably will blow mine out the next time to save and display every year for Easter. 🙂
April 24, 20111:59 pm
Thanks, Jennifer!
You’re right; these would make a beautiful display for a Spring Brunch, not just for Easter! Let me know if you try them. 🙂
April 24, 20112:00 pm
HAPPY EASTER EVERYONE!
Thank you so much to everyone for all the nice compliments on this project! If you found our site through Country Living, we hope you’ll continue to read BigSisLilSis! 🙂
April 26, 20119:57 pm
finally getting back here, i let the blue ones soak over night and they came out very well, i think next time i will let the rust ones soak longer, pretty sure thats my problem.
Thank you!
May 26, 20119:06 am
Hey Lilsis,
I think ur easter eggs were absolutely gourgeous. One thing i really cud not find was a pair of panthose as cheap as the one u bought….where did u buy them from?
February 4, 201212:48 pm
This is stunning! Thank you for posting all of the steps and details. I’m totally inspired and will do something like this with my family this year. Bravo!
February 7, 201211:07 pm
Did you ever try to do the same thing on hard boiled eggs, using beets, cumin, tea etc…would be so nice for a brunch if it works….actually I will try!
March 28, 20121:11 pm
This wonderful idea was published in Sunset Magazine in the late 60’s or early 70’s. My Mom made them with the brown onion skin dye and I’ve been making them ever since (I’m 47). Glad to see people are getting to enjoy them like I have!
March 29, 20121:06 pm
Oh wow, this is amazing!!! Can’t wait to try it this year!
April 3, 20121:31 am
They’re lovely and your directions are so good. I used to live on a farm and made these natural dye ones for my preschool kids. Yours look like ones that will stay on the table in a basket way past Easter/Passover. Thanks for it all.
April 3, 20127:06 am
have you tried a purple onion skin for the color?
April 3, 201211:47 pm
How would this work for ceramic eggs?? I have a dozen ceramic eggs that my mother painted ~ she died 36 years ago. They were recently sent to me and I really had no clue what to do with them. This is beautiful ~ if I thought I could do this without screwing them up this is how I’d want them done.
April 6, 20129:31 pm
Stacy, I don’t think this project would work for ceramic eggs as they would not be porous to absorb the dye. For this project, I tried Ostrich eggs also and they didn’t work because the shells of those eggs are hard and shiny and non-porous. That’s very nice that you have something that your mother painted. I would want to display those “as is”. Thanks for reading!
April 6, 20121:26 am
Did you start with boiled eggs that were cooled or raw eggs? I am planning to do this tomorrow with my kids.
April 6, 20129:28 pm
Julie, I started with raw eggs. The eggs just cook as they boil in the dye. I’m so glad you’ll be making these with your kids; it’s a fun project.
April 6, 20127:08 am
We did this when I was a kid and used red beets to make a red color for our eggs
April 6, 201211:28 am
these are gorgeous! – I’ll bet beets would make for an interesting magenta dye…pink eggs? …and saffron for yellow….or spinach for green ; )
April 6, 20122:47 pm
i am lost. can someone email me of what is natural dyes for eggs? in the pans it shows like egg dye that you’d use to dye eggs.. let me know please, thank you
April 6, 20127:07 pm
Absolutely gorgeous!
April 6, 20129:33 pm
Thanks everyone for the nice comments and the links to this project! We appreciate you reading BigSisLilSis! 🙂
April 8, 201212:29 am
Thanks for this great idea. I tried beets too and they worked ok. They were a little better than the cranberries. The onion skins were by far the best. Walmart had pairs of cheap knee-highs (33cents) and I was able to 6 eggs per pair. I didn’t cut them first. I put the first egg in then tied a knot tight close to the egg. Then I tied another knot right next to the first knot. Then I cut between the two knots. Then in went egg number two. There was no waste that way.
April 8, 20129:11 am
Thanks for the tip on the pantyhose, Geri. No waste is a good thing! I wanted to try beets but never got around to it, I’ll have to try those next time.
April 8, 20124:59 am
Wow, beautiful … two questions popped up for me
1) could you use the same process (flower pressed onto egg) using the traditional dye with tablets
2) could you make the natural dyes ahead of time, cool and reheat?
Just curious..
April 8, 20129:10 am
Karen,
I think you could reheat the natural dye or even use dye tablets with the flowers. Let me know how it turns out if you try it. Thanks for reading.
March 11, 20139:44 am
The brown color is beautiful, too!
March 11, 201311:38 am
I should think using beets would give you a really nice purple or reddish colour.
March 11, 20132:43 pm
You can also use purple cactus fruit for dye. Marigolds is another dye.
March 11, 20135:09 pm
You did not specify if you used pre-boiled eggs or not or if they cook when boiling in the dye – just want to make sure I do it right..
March 13, 201311:44 am
Kristine,
Thanks for the question. The eggs are raw when you decorate them and they cook while boiling in the dye. Thanks for reading BigSisLilSis.
March 11, 20137:41 pm
Did you use just the dry skins from the onions?
Thanks, Nancy
March 13, 201311:45 am
Yes, Nancy, just the dry onion skins. The skins from the yellow onions leave an amazing color on the eggs. For deeper colors, just leave the eggs in the dye longer. Thanks for reading BigSisLilSis!
March 15, 201312:04 pm
They are very beautiful. I am wondering…if you boil the eggs for 30 minutes, don’t they get awfully hard? Are they still edible afterward? Or are these just for looks? Do you start out with boiled eggs, like you do for conventional dyeing?
March 22, 20131:34 am
Hi Linnea,
No, you actually decorate the egg while it is raw, so the 30 minutes in the dye is perfectly fine. These eggs are definitely edible and aren’t too hard at all. I hope you try them and let me know how they turn out. Thanks so much for your question. ~LilSis
March 20, 20133:39 pm
I love the hose and the natural elements for decorating. They are beautifyul. My mom also used to use natural ingredients for coloring our easter eggs. In addition to the ones you used, she used beets for a red/pink, she used leftover green tissue paper for green eggs, after coloring some she would mix the blue with the red for a lavendar. I used these same methods. I am anxious to try the hose and the flowers, etc. Hoppy Easter!!!
March 22, 20131:37 am
Hi Mary,
Thanks so much for your comment. I LOVE the idea of mixing the red and blue for a lavender color! Please let us know how your eggs turn out. ~LilSis
March 29, 201312:51 pm
those would be pretty on a wreath with some dried flowers
March 31, 201311:10 am
FANTASTIC!!
Love the look of these and their unique quality.
Love that you use elements of nature.
Wonderful activity for parents to do with their kids.
Love your generous details too.
March 31, 20138:19 pm
Very nice tutorial!
April 1, 20131:48 am
Thanks for your beautiful blog!! My kids and I tried your suggestions above and got some beautiful eggs (red cabbage, onion skins, artichokes), and some not so great looking ones (blueberries, spinach, and carrots). But the ones with the flowers held on by old nylons were cool! Thanks again for such a great idea!
April 2, 201310:52 am
Thanks Jahn! I made some more this year with the brown onion skins and purple cabbage and I left them in the dye in a mason jar refrigerated overnight and the colors were beautiful! I’m glad you enjoyed this project and we’re happy to have you as a reader!
April 2, 201310:59 am
Thanks again to everyone who commented and/or shared this project with their readers. We really appreciate all of you and hope you continue to enjoy reading BigSisLilSis.
April 7, 20135:52 am
I have used this wrapping technique to put yellow or red onion skins on eggs and then boil them in water. The result is a marble pattern all over the egg. The red skins give a range of colors including blue and green.
April 1, 201410:17 am
Love these! Had the onion-skin ones as a kid (those were the eggs the REAL Easter bunny would leave!) and wanted to do some natural colors this year. I have used cabbage, turmeric, and beet dyes before and would boil it down further, add a touch of vinegar and salt to the “dye” and then color them the “regular” way – dipping the already hard-boiled egg in the dye. Have to keep it in a bit longer, but it will work. Anxious to try it with the flowers. As for spending money on the flowers and fern, I plan to talk to the florist to get cuttings and other scraps…might be free, you never know!
April 10, 20146:15 pm
FYI, don’t know if you have tried it before but I used to use iris flowers to dye small baskets. The purple ones make a VERY dark dye that should work on eggs as well. Of course finding Iris at Easter time may be a problem. maybe freeze some of the flowers when they come into season?
April 17, 20148:05 am
very nice color,and well thought of project. Have a Enjoyable Easter.
March 22, 20151:41 am
Hello,
I absolutely loved your pictures and appreciate all the detailed explanations and steps. It’s my and my husband’s first year dyeing eggs as a married couple, so I have been looking for some new and more creative ways.
Thank you! 🙂
Kari
March 5, 20165:20 pm
Beautiful! How did you make the red ones?
March 19, 20161:53 pm
This post has been featured here > http://sweetmeetsbakeshop.com/2016/03/19/sponged-nail-polish-31-other-diy-dye-free-easter-eggs/
Happy Easter and keep on crafting!
March 22, 20162:16 pm
Great tutorial, I have been making my Easter eggs this way for the last 40 years and can’t wait to do it each year, I love getting to do it with my kids now. We would always do have of our eggs hollow because they were so pretty and we would give those to neighbors and friends as they hated to break the egg.
March 23, 20162:50 pm
I cant remember the last time I had pantyhose in my house. Wish I’d read this before I went to the thrift store..Would had picked up some super cheap.
March 23, 201610:27 pm
The hose looks to be white? This looks so much easier than the ones using silk ties (which didnt work for me). Am going to try this method tomorrow. THNKS!!!