Will P90X Kill a Forty-Plus Woman?

I know LilSis and lots of the other Ten in 2010 participants have started off the new year with a new motivation, increased fitness and weight loss.  Not me though, I've been doing good to just maintain with my 5 gym workouts a week.  Since my priority the last several weeks has been to spend as much time as possible with Bry, I wasn't getting in any additional workouts, which is perfectly fine. My priorities were clear to me.

But now that he's off on his Navy adventure, it's time for me to recommit to getting back into fighting shape.  I never know when I might have an unexpected scuffle with an ornery chick in the parking lot before work!  Yeah, there's a story there, but I'll save that for another day.

The truth is, a forty-plus body wants to get fat.  You have lower metabolism, more aches and pains, less energy, and wacked out hormones.  At least, that's the state of the union in my world.  It takes more and more work to achieve results, and it's very easy to get stuck on plateaus.  Plus, doing the same old stuff starts to lose its effectiveness.

All of that is no excuse though, and I'm not making any.  I don't have a ton of weight to lose, but I do want to build some more muscle and lose those ding dang blobs of fat that insist on congregating and loitering on my rear view.  You know the ones I mean.

P90XI had planned to go back to Jillian Michaels' 30-Day Shred, since she whipped me into decent shape last year with her program.  I'd been rotating the 30-Day Shred with a couple of her other heinie-kicking DVDs, and they really did work.

Bry and his dad have been big fans of P90X though, and Bry said I should give it a try, and swears I can do it.  Really?  Ok.  If you say so, Bry.  I know you care about your old aunt and you wouldn't tell me that if you thought it would be the death of me.

I love a challenge, and with my all-or-nothing personality, P90X is right up my alley, at least theoretically.  One of the things that intrigues me about it is the idea of “Muscle Confusion”, which is said to bring greater results to your bored muscles.  So today, I'm going to do the fitness test to see if I'm up for the P90X challenge.  If not, I'll do the 30-Day Shred for a couple of weeks, and then test again.  If I pass the test, I'm off and running.

I just have one question before I start…will P90X kill a forty-plus woman?  Do you know of any women who have done it and survived; other than Sheryl Crow and Pink?

~BigSis

Posted under Fitness

This post was written by BigSis on February 28, 2010

Tags:

Relastin Buy One Get One Free

BigSis first mentioned how much she liked the Relastin Eye Silk back in November of last year. Honestly, I hadn't ever heard of it but I wasn't totally satisfied with what I was using at the time so I started using the Relastin Eye Silk. I really loved it and decided to share my Eye Silk Results with everyone after I'd used it for about 45 days. I'm still sold on this product.

You can't beat this Relastin 2 for 1 offer!

You can't beat this Relastin 2 for 1 offer!

Last time I bought my Eye Silk, I purposely bought two bottles so I would always have a backup and wouldn't have to worry about ever running out. (I do the same with my Borba Firming Products.) Well, as luck would have it, I recently ran out and now can't find the “backup bottle.”  I've been puzzled about what could have happened to it since I'm the only female in the house. 🙁

I've actually been putting off placing an order in hopes that I would find the missing bottle. I'd finally given up on finding it and was just about to go online to place my order when I received this email yesterday announcing the Relastin 2 for 1 Sale. It came at just the right time!! The Eye Silk normally sells for $69.00 so a BOGO free offer is a fantastic deal! The offer is good through July 31st.

If you haven't tried this product before, it would be a great time to give it a try and possibly split the 2 for 1 with a friend! I'm going to order mine now!

~LilSis

Posted under Beauty and Skin Care

This post was written by LilSis on July 18, 2009

Tags:

How to Make Dairy-Free Almond Milk

I can't start my day without my morning fruit smoothie.  I've never been a milk drinker because of the lactose, and I'm not a fan of soy milk.  That leaves a bunch of great nut milks to choose my smoothie base from, and my favorite is Almond Breeze Unsweetened Vanilla.  I add a splash of juice to it, plus frozen berries, vitamin powder, coconut oil and flax seeds.  Whiz it all up in my pink Kitchenaid blender, and away I go to work with all kinds of nutrients zipping around in my bloodstream.

So, I go through a lot of almond milk, and it's not terribly expensive but if I make it at home, I can choose  the ingredients that go into it and save a little money too.  How difficult is it?  Not difficult at all, in fact, it's pretty darn easy:

  1. Buy raw almonds from the bulk section of your local store.
  2. Soak a cup of them in water for 8 hours, or less if you don't have that long. I think the milk is creamier with longer soaking.
  3. Rinse and drain the soaked almonds.
  4. Blend them with 4 cups of water.
  5. Drain the pulp out.  I use a couple of coffee filters in a strainer over a tall bowl.
  6. Add flavorings and sweetener as desired:  vanilla extract, cinnamon, maple syrup, agave nectar, honey, or anything else.
  7. Chill and enjoy within 3 or 4 days.

Voila!  That's all there is to it!  You could use macadamia nuts or cashews instead of almonds.  I don't know if you could use pecans or walnuts successfully, but it's an intriguing idea.  I like to add the flavorings after I strain the pulp out so that I can use the pulp in a savory way if I choose.  Adding lemon, olive oil, garlic, salt and dill to it makes an awesome spread for crackers.

Remember this milk is dairy-free, but it's not just for vegans.  It's great for anyone who is allergic to milk or lactose-intolerant, or who just wants a healthy tasty beverage.

If you'd like to see photos of the process or learn more, go check out Gina's awesome blog at Choosing Raw.  That's where I learned to do it, and I'm glad I did!

~BigSis

Posted under Food

This post was written by BigSis on September 17, 2009

Tags:

MAC Depot Pan Free

MAC Depot Pan Free

MAC Depot Pan Free

Posted under

This post was written by BigSis on February 24, 2012

Guilt Free Cookies with Agave Nectar

I've had some amber agave nectar and organic coconut oil in my pantry for a while, and it's been recently screaming to be used in baking.  Once I saw that Anna at CookieMadness had whipped up a batch of Agave & Honey Oatmeal Cookies, I was reminded that it was time to put those 2 healthy ingredients into action.

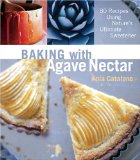
My recipe was adapted from Old-Fashioned Oatmeal Raisin Cookies in Baking with Agave Nectar by Ania Catalano.

Baking with Agave Nectar

Baking with Agave Nectar

It's similar to the recipe Anna used and to RecipeGirl's variation with M&Ms.  I baked the full recipe instead of scaling it down, and I got 24 cookies.  I substituted coconut oil for all of the butter, and agave was my only sweetener.  I also used ground flax seeds instead of wheat germ, and omitted the raisins since I'm allergic and skipped the M&Ms to make these as guilt-free as possible.

As soon as I got these scooped out on the cookie sheets, I was wishing that I had added some sunflower seeds and chopped walnuts to the batter.  Once these were out of the oven, it was clear that those additions would have been scrumptious, so next time I'll do that!  I may also add some dried cranberries or cherries, and perhaps a little shredded coconut to complement the coconut oil's great flavor.

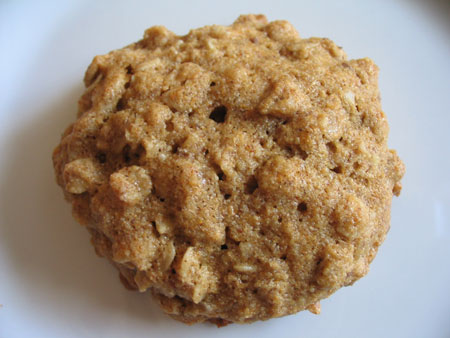
I hesitate to even call these cookies, to me they're more of a healthful substantial pre-workout or post-workout snack.  They're sturdy and cakey, and not very sweet which is a plus for me since I'm not a big sweets eater.  A slight little sprinkle of turbinado sugar on top of each cookie before baking might even be called for!  I loved these chunky cookies, and they got thumbs-up from my coworkers.  I'll definitely make them again.  I love that they're tasty, but they seem to be such great fuel for our bodies!

Agave Coconut Oatmeal Cookie

Agave Coconut Oatmeal Cookie

Agave Coconut Oatmeal Cookies

1/2 cup organic coconut oil
3/4 cup amber agave nectar
2 extra large eggs
1 tsp vanilla extract
1 1/2 c whole wheat pastry flour
1 3/4 c oats (not quick cooking)
1/4 c flax seed (pulverized in coffee grinder)
1 tsp cinnamon
1/2 tsp baking soda
1/2 tsp salt

Preheat oven to 325 degrees, and line 2 cookie sheets with parchment paper or release foil.

Beat the coconut oil in a large bowl with the agave nectar for about 2 minutes until it's well blended and slightly fluffy.  Add the eggs one at a time and then add the vanilla.  In another smaller bowl, combine the flour, oats, flax, cinnamon, soda, and salt.   Add the dry ingredients to the wet ingredients, and stir until just combined. Drop onto cookie sheets by heaping tablespoons and flatten out slightly.  Bake for about 12 minutes until the bottoms are slightly browned and the tops are dry.  Don't overbake.

~BigSis

Posted under Food

This post was written by BigSis on January 22, 2009

Tags:

Just in time for Christmas: Free upgrade on Origins overnight shipping

Is everyone finished with their Christmas shopping?  If not, you might want to take advantage of this great offer from Origins. I just received an email from Origins stating that they are offering a free upgrade on overnight shipping through tomorrow, December 23rd.  Enter the offer code free1day at checkout to take advantage of this offer from Origins!

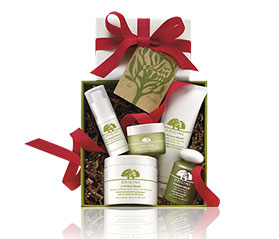
Not only do I love, love, love Origins products for myself, but I've given a lot of Origins gifts to friends and family over the years. You just can't go wrong! They have such a wide price range, too. You can buy a great gift for under $30.00. Origins always has wonderful gift sets and you can even create a custom gift set.

Origins is also offering complimentary gift wrapping.  And one more thing, I received a separate email about another discount from Origins. You can receive 25% off all purchases at any Origins Retail Store (not in a dept. store) through December 24th if you just mention the email! Now, that's a bargain!

Happy Shopping!

~LilSis

Posted under Beauty and Skin Care

This post was written by LilSis on December 22, 2008

Tags: , ,

Creamy Tomato Soup, Cut the Cream!

It may be beautiful and sunny in LilSis' neck o' the woods, but it's colder than a well-digger's butt here in Texas.  I guess that's pretty darn cold, right?  Our last few nights have been close to 10 degrees, and our daytime highs have been well below freezing.  It's definitely soup season here!

I've been trying my new vegan diet on for size this week, and so far, it's been pretty easy.  I've been disappointed to see how many of my favorite products have unexpected animal products in them, but I'll adjust and it really motivates me more. It'll just take a little getting used to, and my palate will need to happily adapt to a dairy and egg-free world.  I did lose 3 pounds this week, but I think it's because it was kind of a detox from the semi-bad eating I've been doing for the last month or so, and some of that weight was bloaty water weight from too much salt, sugar, etc. It's the “etc” that gets you every time!

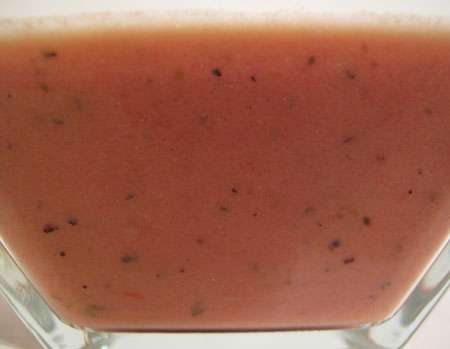
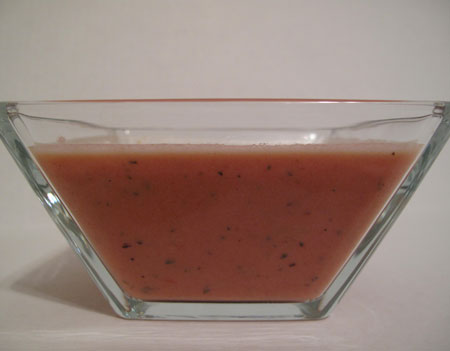
So dinner the other night needed to be 1) soup, 2) vegan, and 3) quick and easy.  Voila!  Here's what I came up with: Creamy Tomato Soup with no added salt, no butter, no cream, no guilt AND lots of flavor!  It's vegan, but I wanted to share it with you because it's so delicious, but isn't loaded with bad fats like the tomato basil soups you usually find.

You can use any seasonings you like.  I used the salt-free Italian seasoning and Mural of Flavor, and surprisingly didn't have to add any salt at all.  I think it may have something to do with the citrus peel in the Mural of Flavor, since lemon reduces our perceived need for salt.  I'm super-sensitive to salt and get big “salt bags” under my eyes from a small amount of it, so being able to skip the salt is huge for me.

Creamy Tomato Soup
(recipe by me)

28 oz can Fire Roasted Crushed Tomatoes
Water (I filled the tomato can about halfway full, but make your soup as thick or thin as you like)
2 tblsp Italian seasoning (I used Pampered Chef salt-free)
Penzeys Mural of Flavor, optional but really tasty
3/4 cup cashew cream (see note below)

Simmer the tomatoes and water in a medium saucepan with the Italian seasoning and Mural of Flavor for about 20 minutes to let flavors develop a bit.  With an immersion blender, puree the soup until it is smooth, or leave it chunky if you prefer.  Stir in cashew cream and heat through.

Note: Cashew cream is my new favorite discovery.  It's from Tal Ronnen's book “The Conscious Cook“.  You might have seen Tal on Oprah recently.  Cashew cream can be used in place of milk or cream in lots of recipes.  All you do is soak some raw cashews for 12 to 24 hours, and when whiz them around in a blender with just enough water to cover them.  That's it!  Just cashews and water.  Sure, nuts do have fat, but it's good fat and you aren't guzzling a gallon of this stuff.  You're just using 3/4 cup in this whole recipe.

~BigSis

Posted under Food

This post was written by BigSis on January 11, 2010

Tags: , ,

Big Boy Room

I love all those great ideas for decorating dorm rooms that BigSis just shared with us. It's nice to know that there are some retailers that make it easy and affordable for us to get just about everything we need in a one-stop shopping trip. Luckily, we've got three years to go before we have to prepare for that big move!

Honestly, it seems like school just let out for the Summer and here we are talking about getting organized to send the kiddos back to school.  When we talk about how fast time flies, here's a perfect example. Last year right before HayHay was about to enter his Freshman year of High School, we all of a sudden noticed that he was literally growing out of his bed.

Well, I wonder why? We bought the bunk beds when he was four years old! So, one day he's a little four year old with brand new bunk beds and the next time I turn around, he's a 5'8″ fourteen year old sleeping on a little twin bed. (You gotta give him credit, he never complained or even mentioned that his feet were hanging off his mattress.) I just ran across the photos that I took for my ad .

Here's what he was sleeping in just last year.

bed

And here was his cute little desk on the end.

desk

I don't even think he could sit in that little chair and fit under the desk!

After one trip to IKEA and some fresh new paint colors, here's what the Big Boy Room looks like now.

Hays room

The IKEA bed, dresser, and nightstand are all from the Hemnes collection. The bed was $299, the dresser was $299 and the nightstand was under $100.

Bed

We got the Quick Silver comforter, sheet set, pillow cases, shams and two pillows at Bed, Bath and Beyond all in one “Bed in a Bag” for under $200.00. They may not have the exact set right now, but I know they have some awesome deals going on for bedding.

Dresser

Finally, drawers big enough to hold big boy clothes.

Led Zeppelin

Yes, the Led Zeppelin wall covering is a ‘hand me down' from BigT.

Rugrats pillowcase

But, I love that he still loves his Rugrat pillowcase!  🙂

I'm not crazy about posters being hung all over the room with thumbtacks, but HayHay managed to do this himself without asking and I've decided that I need to choose my battles.

We never did totally finish his room, so that's one of our projects for this week. We're going to head back to IKEA to try to find shelves for his trophies and some sort of storage unit for all his sports memorabilia and his collection of hats. And, if I find some reasonably priced frames, maybe I can convince him that his surf posters would look better if they were framed.

While at IKEA, I'm going to try to focus on buying just what we need to finish up his room, but in looking through the new 2010 catalog, I'm going to be tempted to browse through the home organization section and the office workspace area.

There's something about getting the kids ready to go back to school that makes me want to reorganized all the cabinets and drawers in preparation for the school books that have to stay at the house and all the new school supplies. I love shopping for school supplies! I probably haven't mentioned it lately, but I do have an office supply fetish. (I could get lost in Staples for hours.)

If I find any amazing bargains or any fun, new items, I'll be back later this week to share them with you.

~LilSis

Posted under Family

This post was written by LilSis on August 17, 2009

Tags:

Stuffed Mushrooms Italian Veganized

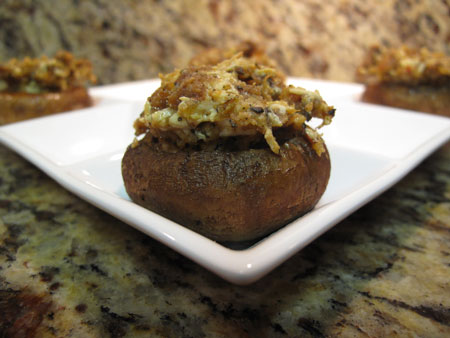
Vegan Stuffed Mushrooms

Happy new year!  LilSis and I love making appetizers, and there is no better opportunity for snack-crafting than New Years Eve and New Years Day!  My old Stuffed Mushrooms Italian recipe is a family favorite, and everyone loves it.  However, it's stuffed with meat and cheese so I haven't made it since I stopped eating critters almost 17 years ago.  It's time to veganize this baby!

This is a pretty easy recipe to veganize; I just substituted Tofutti cream cheese for dairy cream cheese, and sausage-style seitan for the pork sausage.  I think it came out pretty well, but I want to keep tweaking this recipe to see if I can elevate it from “delicious” to “ding dang awesome”!

Vegan Stuffed Mushrooms

Stuffed Mushrooms Italian Veganized

1 small shallot, minced
1 pkg Upton Naturals Italian Sausage Style Seitan
1/4 cup breadcrumbs (I used Panko)
1/2 cup Daiya Mozzarella
4 ounces Tofutti Cream Cheese (1/2 tub)
Olive oil
Seasonings to taste: Italian Seasoning, salt, pepper, Frank's Red Hot Sauce, garlic powder
18 to 24 large mushrooms (depending on their size)

Preheat oven to 350 degrees.

Saute shallot in a small amount of olive oil until softened.  Add seitan and sautee over medium low heat just until heated through; breaking it up with a fork.  When hot, add in the cream cheese and combine well.  Add the Daiya, breadcrumbs and seasonings.  Set aside while you prep the mushrooms.

Wipe mushrooms clean with a damp paper towel.  Rub with a bit of olive oil to keep them from drying out during baking.  Stuff with a generous amount of filling and bake until hot throughout.

Notes:

  • I think I could reduce the amount of breadcrumbs, and perhaps eliminate them altogether since the dairy-free cheeses might bind the mixture together just fine.
  • The filling is nice and creamy before it's baked, but the dairy-free cheeses tend to break down a bit and get less creamy as they're baked.  I'd like to try pre-cooking the mushrooms on the stove top or in the oven, and then add the filling so it cooks for less time.  I definitely want the mushrooms to be completely cooked since raw mushrooms have been found to be carcinogenic.
  • This basic recipe is very customizable.  I can see adding chopped artichokes and black olives to the sausage for a tasty variation.

Happy new year, everyone!  Don't forget to have your blackeyed peas for luck and greens for prosperity.  Add a steamy pan of fresh cornbread and these mushrooms, and you have a delicous start to 2011!

~BigSis

Posted under Holidays

This post was written by BigSis on December 31, 2010

Tags: ,

Kale Chips: Your New Favorite Healthy Snack!

It's a leafy green vegetable.

No!  It's a yummy crunchy chip.

Actually, you're both right.  We're talking about kale chips!

I know, you're skeptical.  Even though I KNOW the health benefits of eating kale, I just don't like it much.  It's bitter and pretty tough, especially when it's raw.  I never really had a kale dish I liked much. Until now!

You can drive to Whole Foods and buy a small bag of kale chips.  They're delicious, but they're $7 or $8.  No joke.

Or you can make you own.  Now, pay close attention because this is pretty darn complicated.  To make kale chips, you go to the store and buy a couple of bunches of kale (organic if you can get it).  You come home and wash it, dry it and tear it into pieces.  Then you spray it with a touch of oil, season it, and bake it til it's crunchy.  Then you eat it and feel very, very virtuous.   😀

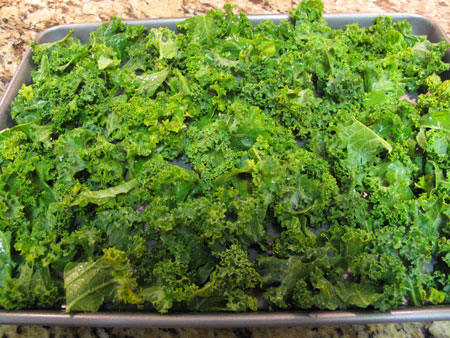
Kale Chips Pan Before Baking

Kale Chips: before baking

Kale Chips

2 bunches kale (I like the curly kind)
Nonstick cooking spray (olive oil or canola)
Your favorite seasoning to taste

Preheat your oven to 375 degrees.  Wash the kale and dry thoroughly.  Pull off the tough center rib and tear each leaf into medium-size pieces.  Place onto a baking sheet and spritz with a touch of oil.  Sprinkle with whatever seasonings you like and toss the kale to evenly coat with oil and seasonings.  Be careful with the salt; it will intensify as the kale shrinks and your chips will be way too salty.

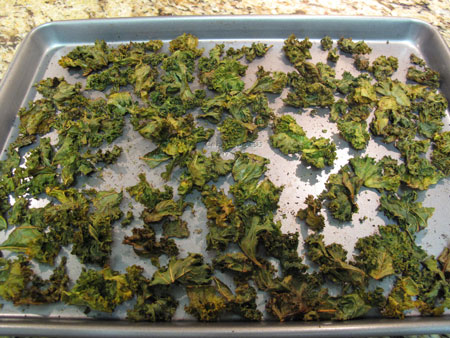
Bake until the kale is dried out and crispy, 20 to 23 minutes.  I like mine lightly browned and pretty crispy.  Enjoy as a snack, or as a garnish on soup.

Note: I seasoned with very little salt, plus a big dash of lemon pepper and a salt-free Penzeys spice blend called Mural of Flavor.

Kale Chips Pan After Baking

Kale Chips: after baking. Not pretty, but delicious!

~BigSis

Posted under Food

This post was written by BigSis on May 6, 2010

Tags: ,