Beach Weather in October!

Today, I was going to write about getting started on decorating the house for Halloween.  I got inspired after my visit to the Pumpkin Farm in Chicago. But, that will have to wait for another day. It feels like summer here and I just can't make myself go pumpkin shopping! Now that I think about it, I haven't even seen pumpkins for sale here yet.  We are having unseasonably hot weather here in Southern California today. It was 91 at the coast! We usually don't even get temps like these in the summer.

Great Waves at the Harbor Today!

HayHay has joined the surf team at his high school and they are supposed to practice at least three times a week. Now he has a perfect excuse to “have to go to the beach.” Somedays, I'm able to stay down there with them, but today, I had too much work to do. So, his friend's mom dropped them off and I picked them up. I always have to take a couple of photos of HayHay, my “surfer dude.”

Time to go!

Time to go!

HayHay loves his new board!

HayHay loves his new board!

There are, however, pros and cons of living in Southern California.  Right as I was leaving our house to go pick them up, I noticed a fire that had started pretty close to where I was located.

On my way to the beach

On my way home from the beach

Plane helping put out the fire!

When we got home, we heard on the news that it had burned 150 acres and then within a few hours, it had burned over 1000 acres. Luckily, there were no structures in immediate danger. There were actually planes and helicopters flying right over our neighborhood.

Photo taken from our house when we arrived home!

Last year, we were surrounded by the California fires.  HayHay missed a week of school due to the poor air quality. We were supposed to stay inside because it was raining “ash.”  Wildfires and earthquakes are definitely the drawbacks to living here in California. I always said that I would never live in California.

But, I also lived in Texas when tornadoes ripped through downtown Ft. Worth and were heading right in our direction. We actually had to take cover that time. We also lived in Upstate New York where it would snow for eight months out of the year. Our first year in New York, the first snow was on Halloween night and the last snow was on Mothers Day.  (And, I had already planted my herb garden.) We did love it there in the summer, though.

I guess no matter where you live, there will always be pros and cons.  We still love it here!

~LilSis

Posted under Family

This post was written by LilSis on October 8, 2008

Tags: , ,

My Inspiration Board

I've been wanting to create an inspiration board for a long time but I've never managed to set aside the time to do it. Thanks to my dear friend, P, who gave me a great IKEA desk, I finally carved out a little corner for myself in our guest room to use as a combination office/craft area. P knew I had wanted to do this for a good while already as I'd been looking around at other desks I could get for myself online using sites similar to https://www.officemonster.co.uk/office-desks-1 and others. Finally getting a desk urged me to create the space I wanted. Having my own space got me really motivated to get my inspiration board made so I could hang it right above my desk.

And since March is National Craft Month, I thought this would be the perfect time for this project. BigSis and I are both crazy about all different sorts of crafts and we recently decided that we want to start sharing more “DIY” crafts with you here on our site.

This bulletin board was Bry's when he was in high school over ten years ago and I've had it stashed in the back of a closet ever since just waiting to be transformed.

This is what it looked like when I pulled it out of the closet.

Inspiration Board

The first thing I did was clean it up and paint the frame a glossy black.

Inspiration BoardI found some nice, thick Scrapbook paper at Jo-Ann Fabrics for a great price, so I bought four 12″ x 12″ sheets with a scrolly design for the corners and four more 12″ x 12″ sheets of a pretty cursive handwriting design to fill in the center and cover all the cork.

Inspiration Board

Once that was done, I just gathered some of my favorite photos and items that inspire me and make me happy. Here's a little something about what some of these mean to me.

I've wanted to go to Italy for many years and BigSis & I hope to some day take a two week dream vacation across Italy.

Inspiration Board

I've talked before about how badly I want to see the Sistine Chapel. This is at the top of my bucket list.

Sistine Chapel on Inspiration Board

Maui happens to be one of my most favorite places on Earth. Just the thought of sitting outside on Kaanapali Beach having lunch at Hula Grill or strolling the artsy/fartsy streets of Pa'ia always makes me smile. These are just a few photos from a previous vacation.

Inspiration Board

I'm inspired by a lot of different things when it comes to my passion for art. Scents, colors, textures, and creative people inspire me. And reminding myself not to worry so much helps keep my mind clear.

Inspiration Board

I collect greeting cards designed by the amazing artist, Josephine Wall and these are just a couple of my favorites. I've made four sculptures that were actually inspired by her cards and my Mermaid was the first and inspired by this card.

Inspiration Board

My ‘Shell Queen' sculpture that I created several years ago was my first to ever be exhibited at a gallery show and she was inspired by another one of Josephine Wall's gorgeous creatures, “Shell Child”. I'm now in love with “My Lady Unicorn” and I think she may be my next sculptural inspiration.

Inspiration Board

And, I also mentioned my love of these bookshelves on our site a couple of years ago. I'd love to have some floor to ceiling bookshelves like these so I think if I keep looking at this photo and visualizing it, maybe I'll have some like this some day!

Inspiration Board

Yoga is a big stress buster for me and I want to be able to do this version of the pigeon pose one day; I came close a few years ago. This photo just inspires me to continue with my yoga practice.

The ceramic cross hanging in the corner is from a series I sold to an art gallery years ago. I have a goal to get back in my clay studio to start producing some new creations before the end of the year and this helps to inspire me.

Inspiration Board

This was such a fun, inexpensive project! I bought some ribbon and some small, headless pins in addition to the scrapbook paper, but the cost was still less than $10.00 since everything you put on your board is either an inspiring photo or an item that you already own.

I just finished my board today and I'm so anxious to get it hung so I can look at it every day. Why didn't I make time to do this sooner?

Inspiration Board

It was probably because I didn't have one single space in my house that I could call my very own. Now, I do. And it makes me very, very happy! 🙂


~LilSis

Posted under Home

This post was written by LilSis on March 3, 2011

Tags: ,

The Best Gift and Food Packaging Store is PaperMart!

How often do you shop online and find great selection, speedy shipping and excellent value?  Not often enough, if you ask me!  I have a site to tell you about that has all three of those boxes checked, and what's even better; they'll help you get ready for Christmas!

Thanks to Anna's recommendation on CookieMadness, I found out about PaperMart a few years back and have been using them ever since.  PaperMart  says they are the largest and most complete packaging store, and I'm here to tell you their claim is justified.

What can you find at PaperMart?  What can't you find might be a better question!  Here are a few of the items we ordered this year for our Charity Bake Sale for Animals (benefiting In-Sync Exotics, by the way).

Paper Mart Paw Print Bags

Paw Print Organza Bags (5″ x 7″ $0.60 each)

PaperMart Paw Print Wire Handle Box

Paw Print Wire Handle Boxes (4″ x 3.5″ $0.88 each)

Paper Mart Candy Cane Ribbon

Candy Cane Satin Ribbon (5/8″ 25 yds $3.94 per roll)

We got the red/pink variety and the red/green one.  Both are gorgeous! These ribbons have the design woven into them, not just printed on like you'll find with cheap ribbon.

Paper Mart Christmas Pink Ribbon

Narrow Christmas Satin Printed Ribbon (5/8″ 25 yds $5.96 roll)

We got the pink Christmas print and the white Christmas ornament prints, and loved both of them.

We loaded up on red and green solid color 5/8″ ribbon too, which was a steal at 100 yds for $3.52.  We were completely impressed by the high quality of all these ribbons.  They are shiny on one side, and matte on the back, but you can upgrade to a variety that is shiny on both sides if you're even more obsessive than we are and don't mind paying a bit more.

We also buy the hard-to-find cello bags that we use for breads and cakes at PaperMart.  I daresay that PaperMart carries pretty much anything and everything you might need for packaging gifts and food this Christmas and year-round.  Check them out and let us know how your shopping experience goes!

~BigSis

Posted under Shopping

This post was written by BigSis on November 20, 2011

Tags: ,

Never a dull moment.

We've had some big events going on these past couple of weeks in our world, which definitely took some of our time away from BigSisLilSis.

Here are just a few things that have been happening:

  • Two weeks ago, BigSis and I met in Chicago for a long weekend to meet Bry's fiance.
  • Last week, I had a training class in Dallas and BigSis was nice enough, after working a full day, to pick me up every night so we could go to dinner.
  • HayHay started his Junior year in high school last Thursday.
  • Bry got married in Illinois on Saturday. (Yes, without family present; sniffle, sniffle…)
  • Bry also learned that he will be stationed here in San Diego and may be relocating as soon as next month! (Hip, hip, hurray!)
  • BigSis spent the whole weekend at WordCamp Dallas; 25 different sessions to be exact!  Ask her about it if you're interested in the scoop!
  • My little guy, HayHay's 17th birthday was yesterday.
  • My 19th wedding anniversary is today.
  • And, I'm anxiously awaiting to hear about my first assignment for my new job.

I'm ready for things to settle down and get back to normal, but I don't even know what normal is any more. I think I'm going to have to redefine “my normal”.  Thankfully, we have a long holiday weekend coming up!

BigSis and I will be getting back on track soon and are also working on some new ideas for our site. Hopefully, we'll be ready to announce a few changes in September!

We hope everyone had a great summer!  🙂  Now, what's going on in your world!  Tell us; it'll make us feel better about our craziness!

~LilSis

Posted under Family

This post was written by LilSis on August 31, 2010

Summer Salad Roundup

Even though we've had unseasonably cool weather this Summer in Southern California, I realize that in some parts of the country there are still many of you experiencing record high temperatures. I feel for you, I promise!

Summer is actually my favorite season but I know, from spending most of my life in Texas, that the last thing anyone wants to do in that kind of heat is to cook. So, I thought this might be a perfect time for a Summer Salad Roundup.

Here are just a few of my favorite Summer Salads.

Ceviche Salad with Avocado, Cilantro, and Green ChileCeviche Salad with Avocado, Cilantro, and Green Chili

Egg White Salad with Spinach, Feta Cheese, and ParmesanEgg White Salad with Spinach, Feta Cheese, and Parmesan

Tomato Salad with Feta, Basil and Balsamic ReductionTomato Salad with Feta, Basil and Balsamic Reduction

Spinach and Orzo SaladSpinach and Orzo Salad

And, last but not least, this is absolutely, positively my most favorite summer salad EVER! And yes, I do realize that I've shared it here before, (more than once) BUT there's no way that I could leave it out of this Summer Salad roundup.

In the Summertime, I make this almost every time we have  friends over and I take it to almost every get-together we attend. You can't go wrong with this salad; just make sure you use fresh mozzarella and the best tomatoes and basil you can get your hands on!

Insalata Alla CapreseInsalata Alla Caprese

These Summer salads are super simple to put together and perfect to take to any Summer barbeque or picnic.

Stay cool and have a great weekend! 🙂

~LilSis

Posted under Food

This post was written by LilSis on August 6, 2010

Tags:

Oatmeal Coconut Chocolate Chip Vegan Cookies

Vegan Oatmeal Coconut Chocolate Chip Cookies

Since our next SPCA Bake Sale is only 6 months away, I better get myself busy building a repertoire of vegan recipes!  I'm almost 6 months into “eating vegan”, but I'm not a big sweets eater so I haven't done much baking.

After my coworker K-to-the-T brought these awesome Chocolate Chunk Oatmeal Coconut Cookies to the office the other day though, I knew this was a recipe I had to adapt asap!  They were scrumptious, and reminded me of a Cowboy Cookie I used to make.  She had made a few tweaks of her own to the original Epicurious recipe, and I tweaked it even more.  Voila and ta da!  Here's my first adapted cookie recipe, sans eggs and dairy products!

Vegan Oatmeal Coconut Chocolate Chip Cookies

Oatmeal Coconut Chocolate Chip Vegan Cookies

Adapted from K-to-the-T and Epicurious

1 stick (1/2 cup) Earth Balance, softened
1/2 cup packed light brown sugar
2 tablespoons granulated sugar
1 teaspoon vanilla
1/4 cup unsweetened applesauce
1/2 teaspoon baking soda
1/4 teaspoon baking powder
1/2 teaspoon cinnamon
1/2 tablespoon ground flax seeds
1/4 teaspoon salt
1/2 cup whole wheat pastry flour
1 cup + 2 tablespoons old-fashioned oats
3/4 cup sweetened flaked coconut
1/2 cup semisweet vegan chocolate chips
1/2 cup walnuts, toasted and chopped

Preheat oven to 350°F.

Beat together Earth Balance and sugars in a bowl with an electric mixer at high speed until fluffy. Add applesauce and vanilla, and mix until blended. In a separate medium bowl, combine flour, baking soda, baking powder, flax seed, cinnamon, and salt. Stir to mix ingredients. Add dry ingredients to wet ingredients and mix at low speed until just blended. Stir in oats, coconut, chocolate chips, and walnuts.

Arrange 1/4-cup mounds of cookie dough about 3 inches apart on 2 ungreased large baking sheets (about 6 cookies per sheet), then gently pat down each mound to about 1/2 inch thick. Bake until golden, about 14 to 15 minutes.

Cool cookies on sheets until set enough to transfer with a spatula to racks to cool completely. Makes about 12 big cookies.

Note: The bottoms of my cookies were pretty brown. I think that using parchment paper might help with that if you prefer lighter bottoms.

My cookies had a slightly different texture than K-to-the-T's, but they were absolutely delicious!  I never would have guessed that they were vegan.  They were moist and chewy, and had great flavor.  I will absolutely make them again…and yes, they may make an appearance at the Bake Sale!

~BigSis

Posted under Food

This post was written by BigSis on June 10, 2010

Tags: , , ,

L’Oreal Extra-Volume Collagen Mascara

Loreal Extra Volume Collagen MascaraHave you been seeing all the ads and hearing all the buzz about L'Oreal's Extra-Volume Collagen Mascara?  I have, including a pretty glowing positive recommendation from More Magazine, which I really like.  I'm always on the lookout for a new great mascara, just as I am for miraculous new eye creams and anti-aging skin cream.

This mascara claims that their “instant-impact brush builds breathtaking volume fast.” I was intrigued and picked up a tube recently.  This shot of Eva Longoria-Parker's lashes from L'Oreal's ad sets a pretty high expectation for the Extra-Volume Collagen Mascara, don't you think?

Eva Longoria Parker Eyes

We usually don't do reviews unless we have something good to say, so let me think.  This mascara is a nice black color, it comes off easily at the end of the day with Lancome BiFacil, it doesn't smudge at all, and it doesn't flake much; no more than the L'Oreal mascaras I like.

Did it give me breathtaking volume like Eva?  No.  I had a really hard time maneuvering the ginormous brush without getting it all over my eyelid, and what I ended up with is stubby lashes.  No volume, no length, no curl.  Just stubs.  And “stubs” is not what I'm aiming for when I apply mascara!  I also got some spiky clumps, again not what I was going for.

So it's back to my usual cocktail of L'Oreal Voluminous Mascara followed by a dash of L'Oreal Lash Out Mascara.  I should have kept my sales receipt and returned L'Oreal's Extra-Volume Collagen Mascara, but I didn't so I guess I'll try to use it up on the weekends.  If you run into me at SuperTarget on a Saturday afternoon, please don't stare at my clumpy, spiky stubs!  😀

~BigSis

Posted under Beauty and Skin Care

This post was written by BigSis on April 12, 2010

Tags:

This Muffin has a Secret

Banana Wheat Germ Muffin

This humble muffin is a muffin with a secret.  He's not very flashy; lots of other muffins are turbo-size, or chock full of fruit and even chocolate chips.  He's not real pretty either; just a modest little tan guy with a few glimpses of nut here and there.  And he's not a sweet-fluffy-puffy-light-as-air muffin.  He's a substantial guy, moist and dense.  But his secret is what makes him more special than the flashy or pretty muffins.  This muffin is healthy AND tasty.

This guy's given name is Banana-Wheat Germ Muffins, and he was born in the cookbook called Veganomicon by Isa Chandra Moskowitz and Terry Hope Romero.  Yep, you guessed it!  This muffin's middle name is Vegan!

Banana Wheat Germ Muffin Top

I made these muffins a couple of times when Bry was here, and we polished the dozen off between us in only a couple of days.  It is true that Bry is my nephew, and a sweet one at that, so even if these muffins were craptastic, he would probably still gobble them up and declare them delicious.  I've had my share of baking disasters though, and I don't count these muffins among them.

This recipe was my first foray into vegan baking, and I was nervous to say the least.  How could I make a delicious baked good with no eggs and no dairy?  The first thing I needed to do was find a reliable and creative vegan cookbook, and Veganomicon fits the bill.

These muffins use baking powder for leavening, with a bit of canola oil added to the mashed banana for tenderness and moisture.  I made just a couple of changes to the original recipe.  I added about a cup of toasted, roughly chopped walnuts, and used my homemade almond milk instead of soy milk.  I also added a dash of good nutmeg, along with the cinnamon.  You can find the recipe for Banana-Wheat Germ Muffins on RecipeZaar.

Banana Wheat Germ Muffin Split

There's a lot to love about these muffins.  They are:

  • Low in sugar: only 1/3 cup for the whole dozen.
  • Full of whole grains from the whole wheat pastry flour and wheat germ.
  • Low in fat: only 1/3 cup canola oil.  No butter, no eggs, no sour cream, nothing to clog your arteries!
  • Easy to customize by adding your favorite nuts, seeds or spices.
  • Filling and do a great job of keeping you satisfied til lunchtime.

One note:  I think these are better the second day.  The first day, they have a very slight bitter aftertaste that I suspect may come from the wheat germ, but it mellows and dissipates by the second day.

Hey, LilSis! Don't give up on baking, even if you weren't happy with your Low Fat Fruity Breakfast Muffins.  Any time you try a modification, you run the risk of a boo-boo, but keep trying!  I wonder if maybe you weren't totally pleased with these muffins because there was a pretty high ratio of goodies to batter?  And don't be intimidated by the fact that SisMama and I like to bake; we both have our failures and we both always use a recipe!  Don't quit!  For the love of HayHay and SirHoney's sweet tooth, don't quit! 🙂

~BigSis

Posted under Food

This post was written by BigSis on March 14, 2010

Tags: , ,

Homemade Spicy V8 Juice Recipe

Homemade Spicy V8 Juice Recipe

I've always wanted to find a good homemade spicy V8 juice recipe, since the store-bought juice is just too darn salty. I absolutely love it, but the sodium level gives me salt bags of epic proportions. Not a good look, and definitely not good for you.

I'm a total juice fiend lately – ever since I started having green juice every day – so I decided to try my hand at a homemade spicy V8 juice recipe. I have to tell you that I'm thrilled with the results!

Store-bought V8 juice is made of reconstituted juices of carrot, tomato, watercress, lettuce, parsley, beet, celery and spinach. I didn't have any watercress, my spicy healing green juice used all my lettuce up, and I don't like the flavor of parsley, so I used spinach for all the greens this first go-round.

I think using a variety of greens would give the juice even more depth of flavor, so that will be the first change I make in the next batch o' BigSis V8. Technically, what I have here is V7. 🙂  Next time, I'm going to use romaine and a few kale leaves for part of the spinach, so I guess I'll have V9 juice then.

I love the balance of tomato to carrot to beet, and the celery and bell pepper are adding in the right touches of flavor too. The spinach and lemon bring it all together.

This first version leans a little spicy, but it's not quite as zippy as my green juice. Feel free to leave out the garlic, horseradish and cayenne to make a more pure V8.

One last note about this recipe is that it's raw. I've seen some homemade V8 recipes online that were cooked, which baffles me a little. Cooking the veggies defeats the purpose of juicing for me, so we're going raw here. I betcha you could lightly run some tomatoes through the blender and mix them into the fresh juice if you really want a thicker texture to your juice.

Homemade Spicy V8 Juice Recipe

6 carrots
1 very small beet
8 Roma tomatoes (you want a firm tomato for juicing)
1 red bell pepper
3 huge handfuls of spinach
3 stalks celery
1 clove garlic
4 small or 2 large lemons
1-2 tablespoons prepared horseradish (not creamed)
1/4 to 1/2 tsp salt
1/4 to 1/2 tsp cayenne pepper

Wash all the produce thoroughly. Remove seeds and stem from pepper, and cut into large chunks. Cut ends from carrots and beet, and cut into chunks. Peel the lemons and cut into quarters. Half the tomatoes, and cut celery into big pieces. Juice everything together, and season to taste.

This recipe makes round 32 ounces. Drink within 2 days for maximum nutrition.

I don't drink vodka, but I also think this juice would make a heck of a Bloody Mary! 🙂

~BigSis

Posted under Food, Health

This post was written by BigSis on April 20, 2013

Tags:

Heart Painted Glass Marble Magnets for Valentine’s Day

Almost 2 years ago, I showed you how to make painted marble magnets with crosses. Remember these?

Glass Marble Magnet Red Cross

Glass Marble Magnet Green Cross

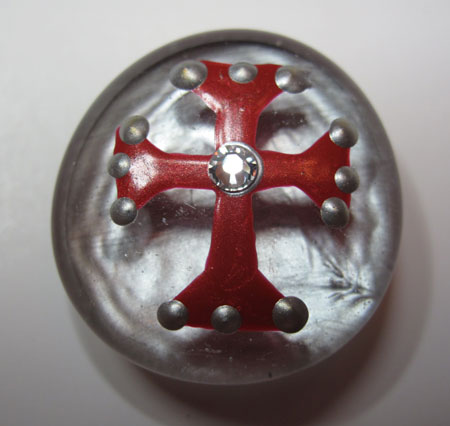
I've been making them for years, and I especially like to make them for Easter gifts and Christmas stocking stuffers. There's another holiday coming up that lends itself perfectly to these little gifties though. Its Valentine's Day, and that of course means we draw hearts!

The method is the same as I showed you for crosses. With the hearts though, I just freehand it instead of using a guide behind the marble. I'm not sure why I forego a guide with hearts. Maybe it's a deep-seated psychological ideal that matters of the heart should be allowed to be free to become what they will, rather than following a template.

Nah, that's not it.

I think I just like the imperfect nature of these drawn freehand and it kind of reminds me of making Valentines as a kid, back when we weren't so obsessed with everything being perfect. Heart shapes are like pizza to me; even a flawed heart shape is still a happy heart! Bad pizza is still pizza!

If I could give you one piece of advice, however, don't have 3 cups of coffee like I did before you start painting these! Shaky hands and this project don't go very well together. Your hearts might be more imperfect than you expect!

I've tried a lot of different glass paints, and this time I tried a new one. I bought several bottles of Martha Stewart's relatively new line of craft paints that are approved for a variety of surfaces, including glass. It's called Multi-Surface Acrylic Craft Paint, and I chose the pearl finish because I think it's prettier than flat or plain glossy finishes on the marbles. I chose a variety of pinks and lavenders since it's Valentine's Day: Purple Martin, Eclipse, Fruit Punch, Pink Taffeta, and Antique Silk.

Martha Stewart Glass Craft Paint Painted Glass Marble Magnets

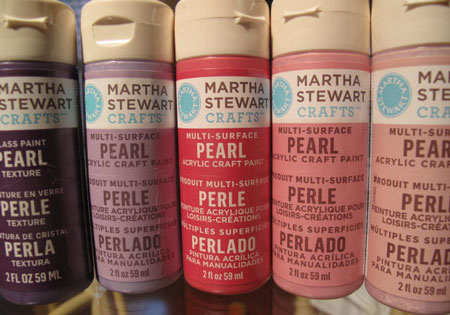
Martha also has a new-ish line of glass paint, but it's slightly more expensive and I wanted to see how this multi-surface paint held up. You can air-cure both paints for 21 days, but you can bake the dedicated glass paint if you wish to speed up the process. For these magnets, neither is necessary since we don't need the magnets to be food-safe or dishwasher-safe. I'm just reasonably careful with the marbles until the paint has had a chance to bond with the glass.

Overall, I really like Martha's craft paint. The selection of colors is awesome – as you would expect from Martha. There are also metallic, gloss and glitter finishes in the line too. I would have chosen the glitter variety, but I think it probably would have clogged the tiny painting tips I use.

The coverage was great, and I didn't get many bubbles which is fantastic. If I could change anything, I might wish for the paint to be the tiniest, tiniest bit thinner so that it took slightly less effort to squeeze the paint out of the itty bitty painting tip. On the upside, when I made dots they held their texture and didn't completely flatten out.

So, let's get to it! For more detailed instructions and photos, please refer to my previous post on how to make painted marble magnets with crosses.

The first thing we need to do is gently clean the glass marbles. I like to use straight white vinegar with a water rinse afterwards. Let them dry for a bit, and then dry each one to make sure you don't get spots. Place them on a foil or paper towel lined baking sheet. Be careful not to touch the surface of the marble with your hands, just to make sure no body oils get on your squeaky clean marble. This will help ensure that the paint adheres.

Attach a metal glass painting tip to the nozzle of a plastic paint bottle. You can get the bottles and tips in a kit at many craft stores. Then just draw a heart, and fill it in with paint.

Heart Painted Glass Marble Magnet

Heart Painted Glass Marble Magnet Lavender

Heart Painted Glass Marble Magnets

If you see any air bubbles form, try to immediately pop them with the painting tip. Allow the paint to dry, at least 2 hours, depending on how thick your paint is.

Once your first coat is dry, go back and apply a second coat. The second coat will be essential if your paint is somewhat sheer or streaky, but I think a second coat always helps to smooth and even out the first coat.

Heart Painted Glass Marble Magnets

Heart Painted Glass Marble Magnet

I added one little twist with the hearts that I didn't do with the crosses. I added a sprinkle of glitter to the marble while the second coat of paint was wet, and I like how it came out…sparkly!

Heart Painted Glass Marble Magnet 2c

Heart Painted Glass Marble Magnet 2

After the second coat of paint is completely dry, I flip the marbles over and apply a thin coat of shimmery white to the back. I think it helps to hide the magnet a little bit, but this is totally optional. My favorite paint for this purpose is PermEnamel in White Pearl. With the crosses, I used a variety of colors for the back of the marbles, just for fun and different effects.

Heart Painted Glass Marble Magnet Back

Once that background coat dries, it's time to get dotty. Using a contrasting color of paint, just make dots all over the hearts with the same painting tip. On some hearts I just make an outline, but on others I go dot wild! Here are the finished heart glass marble magnets.

Heart Painted Glass Marble Magnets

Heart Painted Glass Marble Magnet d1

Heart Painted Glass Marble Magnets d2

Heart Painted Glass Marble Magnets d3

Heart Painted Glass Marble Magnets d4

Heart Painted Glass Marble Magnets d5

After your dots have dried, you can attach a magnet to the back and then decide how to package these little gems.

Heart Painted Glass Marble Magnet Candy Box

This is my favorite way. I think they look like little candy bon bons! I used a tiny paper candy cup tucked inside a clear plastic Wilton box that is often used for wedding favors.

You could also package the marble magnets in small drawstring organza bags with a bit of colored shred, or in a stamped paper mache box like I made for the cross painted magnets. Inside the lid, you could include a scripture that focuses on love, a verse from a favorite poem, or anything else that has meaning for you and the recipient of your gift.

Cross Painted Glass Marble Magnet

However you choose to package these heart painted glass marble magnets, I'm sure that everyone you give one to will appreciate that you created a personal handmade gift just for them! That to me is the meaning of the holiday. Happy Valentine's Day!

~BigSis

Posted under Holidays

This post was written by BigSis on February 10, 2013

Tags: ,